- 将单个服务的多个实例注册到 eureka - 任何代码示例
- 微服务到Eureka命名服务器
- 微服务到Eureka命名服务器(1)
- 微服务到Eureka命名服务器
- Eureka命名服务器(1)
- Eureka命名服务器
- Eureka命名服务器
- 注册watch服务java(1)
- 将 exe 注册为 Windows 服务 (1)
- 注册类 - Python (1)
- 注册 - Python (1)
- 注册watch服务java代码示例
- 注册服务工作者 - Javascript (1)
- 将 exe 注册为 Windows 服务 - 任何代码示例
- 注册 - Python 代码示例
- 注册类 - Python 代码示例
- 注册服务工作者 - Javascript 代码示例
- Spring Boot-Eureka服务器
- Spring Boot-Eureka服务器(1)
- baeldung eureka (1)
- 注册服务工作者 - TypeScript (1)
- 注册 - 任何代码示例
- 注册服务工作者 - TypeScript 代码示例
- baeldung eureka - 任何代码示例
- django 注册 - Python (1)
- 服务 - Python (1)
- 插件注册(1)
- 插件注册
- django 注册 - Python 代码示例
📅 最后修改于: 2020-11-11 05:43:06 🧑 作者: Mango
在本章中,您将详细学习如何将Spring Boot Micro服务应用程序注册到Eureka Server中。注册该应用程序之前,请确保Eureka Server在端口8761上运行,或者首先构建Eureka Server并运行它。有关构建Eureka服务器的更多信息,请参考上一章。
首先,您需要在我们的构建配置文件中添加以下依赖项,以将微服务注册到Eureka服务器。
Maven用户可以将以下依赖项添加到pom.xml文件中-
   org.springframework.cloud
   spring-cloud-starter-eureka
Gradle用户可以将以下依赖项添加到build.gradle文件中-
compile('org.springframework.cloud:spring-cloud-starter-eureka')
现在,我们需要在主Spring Boot应用程序类文件中添加@EnableEurekaClient批注。 @EnableEurekaClient注释使您的Spring Boot应用程序充当Eureka客户端。
主要的Spring Boot应用程序如下所示-
package com.tutorialspoint.eurekaclient;

import org.springframework.boot.SpringApplication;
import org.springframework.boot.autoconfigure.SpringBootApplication;
import org.springframework.cloud.netflix.eureka.EnableEurekaClient;

@SpringBootApplication
@EnableEurekaClient
public class EurekaclientApplication {
   public static void main(String[] args) {
      SpringApplication.run(EurekaclientApplication.class, args);
   }
}
要将Spring Boot应用程序注册到Eureka Server中,我们需要在application.properties文件或application.yml文件中添加以下配置,并在我们的配置中指定Eureka Server URL。
下面给出了application.yml文件的代码-
eureka:
   client:
      serviceUrl:
         defaultZone: http://localhost:8761/eureka
      instance:
      preferIpAddress: true
spring:
   application:
      name: eurekaclient
下面给出了application.properties文件的代码-
eureka.client.serviceUrl.defaultZone  = http://localhost:8761/eureka
eureka.client.instance.preferIpAddress = true
spring.application.name = eurekaclient
现在,在主Spring Boot应用程序中添加Rest Endpoint以返回String,并在构建配置文件中添加Spring Boot Starter Web依赖项。遵守下面给出的代码-
package com.tutorialspoint.eurekaclient;

import org.springframework.boot.SpringApplication;
import org.springframework.boot.autoconfigure.SpringBootApplication;
import org.springframework.cloud.netflix.eureka.EnableEurekaClient;
import org.springframework.web.bind.annotation.RequestMapping;
import org.springframework.web.bind.annotation.RestController;

@SpringBootApplication
@EnableEurekaClient
@RestController
public class EurekaclientApplication {
   public static void main(String[] args) {
      SpringApplication.run(EurekaclientApplication.class, args);
   }
   @RequestMapping(value = "/")
   public String home() {
      return "Eureka Client application";
   }
}
整个配置文件如下。
对于Maven用户-pom.xml
   4.0.0
   com.tutorialspoint
   eurekaclient
   0.0.1-SNAPSHOT
   jar

   eurekaclient
   Demo project for Spring Boot


      org.springframework.boot
      spring-boot-starter-parent
      1.5.9.RELEASE


      UTF-8
      UTF-8
      1.8
      Edgware.RELEASE


         org.springframework.cloud
         spring-cloud-starter-eureka


         org.springframework.boot
         spring-boot-starter-web


         org.springframework.boot
         spring-boot-starter-test
         test


            org.springframework.cloud
            spring-cloud-dependencies
            ${spring-cloud.version}
            pom
            import


            org.springframework.boot
            spring-boot-maven-plugin
对于Gradle用户– build.gradle
buildscript {
   ext {
      springBootVersion = '1.5.9.RELEASE'
   }
   repositories {
      mavenCentral()
   }
   dependencies {
      classpath("org.springframework.boot:spring-boot-gradle-plugin:${springBootVersion}")
   }
}

apply plugin: 'java'
apply plugin: 'eclipse'
apply plugin: 'org.springframework.boot'

group = 'com.tutorialspoint'
version = '0.0.1-SNAPSHOT'
sourceCompatibility = 1.8

repositories {
   mavenCentral()
}
ext {
   springCloudVersion = 'Edgware.RELEASE'
}
dependencies {
   compile('org.springframework.cloud:spring-cloud-starter-eureka')
   testCompile('org.springframework.boot:spring-boot-starter-test')
   compile('org.springframework.boot:spring-boot-starter-web')
}
dependencyManagement {
   imports {
      mavenBom "org.springframework.cloud:spring-cloud-dependencies:${springCloudVersion}"
   }
}
您可以创建一个可执行的JAR文件,并使用以下Maven或Gradle命令运行Spring Boot应用程序-
对于Maven,您可以使用以下命令-
mvn clean install
在“ BUILD SUCCESS”之后,您可以在目标目录下找到JAR文件。
对于Gradle,您可以使用以下命令-
gradle clean build
在“ BUILD SUCCESSFUL”之后,您可以在build / libs目录下找到JAR文件。
现在,使用如下所示的命令运行JAR文件:
java –jar
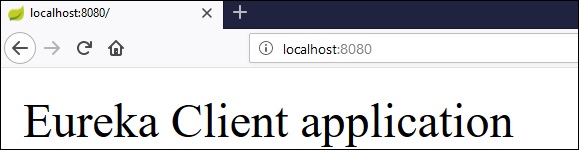
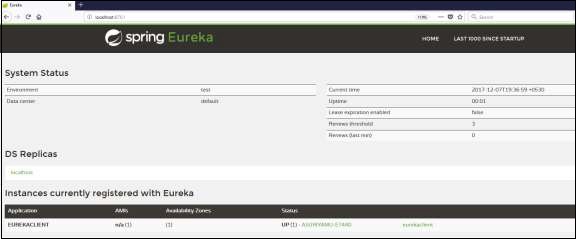
现在,该应用程序已在Tomcat端口8080上启动,并且Eureka Client应用程序已向Eureka Server注册,如下所示-

在您的Web浏览器中单击URL http:// localhost:8761 /,您可以看到Eureka Client应用程序已在Eureka Server中注册。
现在,在Web浏览器中访问URL http:// localhost:8080 /并查看Rest Endpoint输出。