- Angular 6-数据绑定(1)
- Angular 7数据绑定
- Angular 4-数据绑定(1)
- Angular 6-数据绑定
- Angular 7属性绑定
- Angular 4-事件绑定
- Angular 7事件绑定
- Angular 8中的事件绑定(1)
- Angular 8中的事件绑定
- Angular 7事件绑定(1)
- Angular 6-事件绑定
- Angular 4-事件绑定(1)
- Angular 2-元数据
- Angular 2-元数据(1)
- Angular 8中的样式绑定(1)
- Angular 8中的样式绑定
- Android中的数据绑定示例
- Android中的数据绑定示例(1)
- r r 将数据帧列表绑定到一个数据帧中 (1)
- 绑定值 (1)
- F#让绑定(1)
- F#让绑定
- kotlin 中的数据绑定(1)
- ReactJS 数据绑定
- ReactJS 数据绑定(1)
- kotlin 代码示例中的数据绑定
- 启用数据绑定 (1)
- AngularJS |数据绑定
- AngularJS |数据绑定(1)
📅 最后修改于: 2020-10-28 05:15:47 🧑 作者: Mango
可以从AngularJS,Angular 2中获得数据绑定,现在在Angular 4中也可以使用。我们将花括号用于数据绑定-{{}};此过程称为插值。在前面的示例中,我们已经看到了如何声明变量title的值,并在浏览器中打印出相同的值。
app.component.html文件中的变量称为{{title}},并且title的值在app.component.ts文件和app.component.html中初始化,然后显示该值。
现在让我们在浏览器中创建一个下拉列表。为此,我们在app.component.ts中创建了一个月份数组,如下所示:
import { Component } from '@angular/core';

@Component({
   selector: 'app-root',
   templateUrl: './app.component.html',
   styleUrls: ['./app.component.css']
})
export class AppComponent {
   title = 'Angular 4 Project!';
   // declared array of months.
   months = ["January", "Feburary", "March", "April", "May",
            "June", "July", "August", "September",
            "October", "November", "December"];
}
上面显示的月份数组将显示在浏览器的下拉列表中。为此,我们将使用以下代码行-
Welcome to {{title}}.
Months :
我们使用选项创建了普通的select标签。在选项中,我们使用了for循环。 for循环用于迭代月份的数组,这反过来将创建带有月份中存在的值的选项标签。
Angular中的语法为* ngFor =“让我数月” ,要获取月的值,我们将其显示在{{i}}中。
两个大括号有助于进行数据绑定。您在app.component.ts文件中声明变量,并且将使用大括号将其替换。
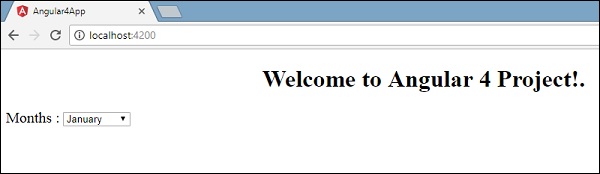
让我们在浏览器中查看上个月数组的输出
可以使用大括号将app.component.ts中设置的变量与app.component.html绑定。例如{{}} 。
现在让我们根据条件在浏览器中显示数据。在这里,我们添加了一个变量并将其值分配为true。使用if语句,我们可以隐藏/显示要显示的内容。
例
import { Component } from '@angular/core';

@Component({
   selector: 'app-root',
   templateUrl: './app.component.html',
   styleUrls: ['./app.component.css']
})

export class AppComponent {
   title = 'Angular 4 Project!';
   //array of months.
   months = ["January", "February", "March", "April",
            "May", "June", "July", "August", "September",
            "October", "November", "December"];
   isavailable = true;   //variable is set to true
}
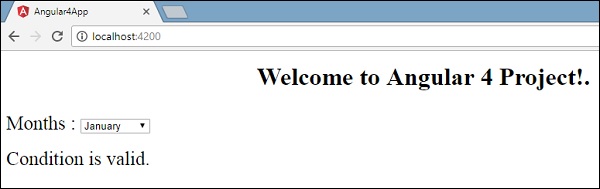
Welcome to {{title}}.
Months :
Condition is valid.
//over here based on if condition the text condition is valid is displayed.
If the value of isavailable is set to false it will not display the text.
输出
让我们使用IF THEN ELSE条件尝试上面的示例。
例
import { Component } from '@angular/core';
@Component({
selector: 'app-root',
templateUrl: './app.component.html',
styleUrls: ['./app.component.css']
})
export class AppComponent {
title = 'Angular 4 Project!';
//array of months.
months = ["January", "February", "March", "April",
"May", "June", "July", "August", "September",
"October", "November", "December"];
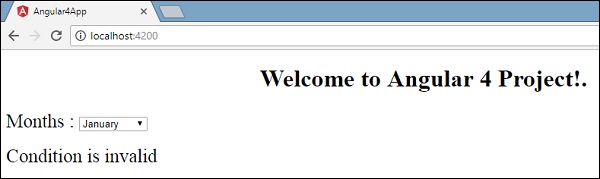
isavailable = false;
}
在这种情况下,我们将isavailable变量设置为false。要打印else条件,我们将必须创建ng-template ,如下所示:
Condition is invalid
完整的代码看起来像这样-
Welcome to {{title}}.
Months :
Condition is valid.
Condition is invalid
如果与else条件一起使用,并且使用的变量为condition1 。为ng-template分配了相同的ID ,并将可用变量设置为false时,将显示条件无效的文本。
以下屏幕截图显示了浏览器中的显示。
现在让我们使用if then else条件。
import { Component } from '@angular/core';

@Component({
   selector: 'app-root',
   templateUrl: './app.component.html',
   styleUrls: ['./app.component.css']
})

export class AppComponent {
   title = 'Angular 4 Project!';
   //array of months.
   months = ["January", "February", "March", "April",
            "May", "June", "July", "August", "September",
            "October", "November", "December"];
   isavailable = true;
}
现在,我们将尽变量isavailable为真。在html中,条件通过以下方式编写-
Welcome to {{title}}.
Months :
Condition is valid.
Condition is valid
Condition is invalid
如果变量为true,则为condition1 ,否则为condition2 。现在,创建了两个模板,其ID为#condition1和#condition2 。
浏览器中的显示如下-
