使用Python构建更改 PC 壁纸的应用程序
先决条件: Python GUI – tkinter
在本文中,我们将使用Python中的py-wallpaper模块为后台更改应用程序编写脚本。 py-wallpaper模块用于更换背景墙纸。在开始之前,我们需要安装 py-wallpaper。
安装:
要安装此类型,请在终端中输入以下命令。
pip install py-wallpaper
入门
导入模块。
Python3
# import modules
from wallpaper import set_wallpaper, get_wallpaper
Python3
# get current wallpaper's path
print(get_wallpaper())

# set your photo
set_wallpaper("location/to/image.jpg")
Python3
# import modules
from tkinter import *
from tkinter import filedialog
from wallpaper import set_wallpaper

# user define funtion
def change_wall():

    # set your photo
    try:
        set_wallpaper(str(path.get()))
        check = "success"

    except:

        check = "Wallpaper not found !"
    result.set(check)


def browseFiles():
    filename = filedialog.askopenfilename(initialdir="/",
                                          title="Select a File",
                                          filetypes=(("jpeg files", "*.jpg"), ("all files", "*.*")))
    path.set(filename)

    # Change label contents
    label_file_explorer.configure(text="File Opened: "+filename)
    return filename


# object of tkinter
# and background set for red
master = Tk()
master.configure(bg='light grey')

# Variable Classes in tkinter
result = StringVar()
path = StringVar()


label_file_explorer = Label(
    master, text="Select a image", width=100, fg="blue")


# Creating label for each information
# name using widget Label
Label(master, text="Select image : ", bg="light grey").grid(row=0, sticky=W)
Label(master, text="Status :", bg="light grey").grid(row=3, sticky=W)


# Creating lebel for class variable
# name using widget Entry
Label(master, text="", textvariable=result,
      bg="light grey").grid(row=3, column=1, sticky=W)

# creating a button using the widget
# Button that will call the submit function
b = Button(master, text="Open", command=browseFiles, bg="white")
b.grid(row=0, column=2, columnspan=2, rowspan=2, padx=5, pady=5,)

label_file_explorer.grid(column=1, row=1)

c = Button(master, text="Apply", command=change_wall, bg="white")
c.grid(row=2, column=2, columnspan=2, rowspan=2, padx=5, pady=5,)

mainloop()
现在,您可以使用 get_wallpaper 属性获取当前的背景图像位置,并且可以使用 set_wallpaper 进行更改。
蟒蛇3
# get current wallpaper's path
print(get_wallpaper())

# set your photo
set_wallpaper("location/to/image.jpg")
输出:
D:\img\wallpapersden.com_money-heist_3840x2232.jpg
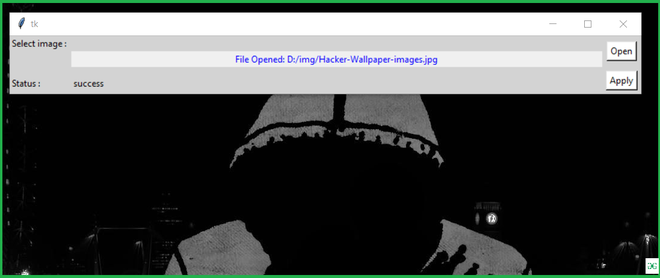
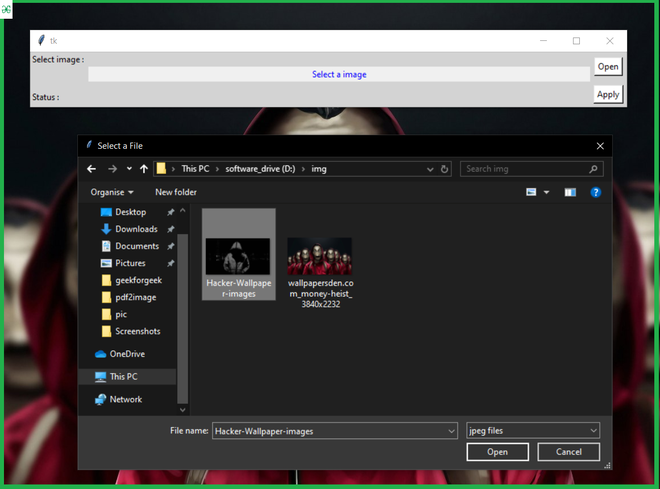
带有Tkinter的背景更改器应用程序:此脚本将上述实现实现到 GUI 中。
蟒蛇3
# import modules
from tkinter import *
from tkinter import filedialog
from wallpaper import set_wallpaper

# user define funtion
def change_wall():

    # set your photo
    try:
        set_wallpaper(str(path.get()))
        check = "success"

    except:

        check = "Wallpaper not found !"
    result.set(check)


def browseFiles():
    filename = filedialog.askopenfilename(initialdir="/",
                                          title="Select a File",
                                          filetypes=(("jpeg files", "*.jpg"), ("all files", "*.*")))
    path.set(filename)

    # Change label contents
    label_file_explorer.configure(text="File Opened: "+filename)
    return filename


# object of tkinter
# and background set for red
master = Tk()
master.configure(bg='light grey')

# Variable Classes in tkinter
result = StringVar()
path = StringVar()


label_file_explorer = Label(
    master, text="Select a image", width=100, fg="blue")


# Creating label for each information
# name using widget Label
Label(master, text="Select image : ", bg="light grey").grid(row=0, sticky=W)
Label(master, text="Status :", bg="light grey").grid(row=3, sticky=W)


# Creating lebel for class variable
# name using widget Entry
Label(master, text="", textvariable=result,
      bg="light grey").grid(row=3, column=1, sticky=W)

# creating a button using the widget
# Button that will call the submit function
b = Button(master, text="Open", command=browseFiles, bg="white")
b.grid(row=0, column=2, columnspan=2, rowspan=2, padx=5, pady=5,)

label_file_explorer.grid(column=1, row=1)

c = Button(master, text="Apply", command=change_wall, bg="white")
c.grid(row=2, column=2, columnspan=2, rowspan=2, padx=5, pady=5,)

mainloop()
输出:
选择此壁纸后。