- expressjs (1)
- expressjs - 任何代码示例
- ExpressJS教程(1)
- ExpressJS教程
- ExpressJS-资源(1)
- ExpressJS-资源
- ExpressJS-模板
- ExpressJS-模板(1)
- 讨论ExpressJS
- 讨论ExpressJS(1)
- ExpressJS-环境(1)
- ExpressJS-环境
- ExpressJS-概述(1)
- ExpressJS-概述
- ExpressJS-路由
- ExpressJS-路由(1)
- ExpressJS-身份验证(1)
- ExpressJS-身份验证
- ExpressJS-会话(1)
- ExpressJS-会话
- ExpressJS-HTTP方法(1)
- ExpressJS-HTTP方法
- ExpressJS-调试
- ExpressJS-调试(1)
- ExpressJS-表单数据
- ExpressJS-表单数据(1)
- ExpressJS-错误处理
- ExpressJS-错误处理(1)
- ExpressJS-中间件
📅 最后修改于: 2020-10-25 11:09:08 🧑 作者: Mango
我们不断收到请求,但最终没有将它们存储在任何地方。我们需要一个数据库来存储数据。为此,我们将使用NoSQL数据库MongoDB 。
要安装并阅读有关Mongo的信息,请单击此链接。
为了将Mongo与Express结合使用,我们需要用于节点的客户端API。我们有多种选择,但是在本教程中,我们将坚持使用mongoose 。 Mongoose用于Node for MongoDB中的文档建模。对于文档建模,我们创建一个Model (非常类似于面向文档编程中的类),然后使用该Model生成文档(就像我们在OOP中创建一个类的文档一样)。我们所有的处理都将在这些“文档”上完成,然后最后,我们将这些文档写入数据库中。
设置猫鼬
现在您已经安装了Mongo,让我们以安装其他节点软件包的相同方式安装Mongoose-
npm install --save mongoose
在开始使用猫鼬之前,我们必须使用Mongo Shell创建数据库。要创建一个新的数据库,请打开您的终端并输入“ mongo”。 Mongo Shell将启动,输入以下代码-
use my_db
将为您创建一个新的数据库。每当您打开mongo shell时,它将默认为“ test” db,您将必须使用与上述相同的命令更改为数据库。
要使用Mongoose,我们将在index.js文件中要求它,然后连接到在mongodb:// localhost上运行的mongodb服务。
var mongoose = require('mongoose');
mongoose.connect('mongodb://localhost/my_db');
现在我们的应用程序已连接到我们的数据库,让我们创建一个新的模型。该模型将充当我们数据库中的集合。要创建新模型,请在定义任何路由之前使用以下代码-
var personSchema = mongoose.Schema({
   name: String,
   age: Number,
   nationality: String
});
var Person = mongoose.model("Person", personSchema);
上面的代码为人员定义了架构,并用于创建Mongoose模式的Person 。
保存文件
现在,我们将创建一个新的html表单;该表格将帮助您获取一个人的详细信息并将其保存到我们的数据库中。要创建表单,请在views目录中创建一个名为person.pug的新视图文件,其内容如下:
html
head
   title Person
   body
      form(action = "/person", method = "POST")
      div
         label(for = "name") Name:
         input(name = "name")
      br
      div
         label(for = "age") Age:
         input(name = "age")
      br
      div
         label(for = "nationality") Nationality:
         input(name = "nationality")
      br
      button(type = "submit") Create new person
另外在index.js中添加新的get路由以呈现此文档-
app.get('/person', function(req, res){
   res.render('person');
});
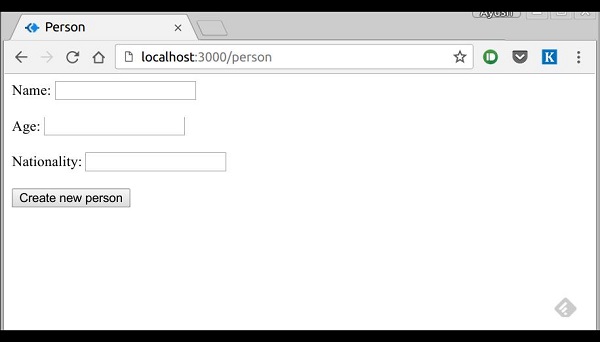
转到“ localhost:3000 / person ”以检查表单是否显示正确的输出。请注意,这只是用户界面,尚无法使用。以下屏幕截图显示了表单的显示方式-
现在,我们将在‘/ person’定义一个路由后处理程序,它将处理该请求
app.post('/person', function(req, res){
   var personInfo = req.body; //Get the parsed information

   if(!personInfo.name || !personInfo.age || !personInfo.nationality){
      res.render('show_message', {
         message: "Sorry, you provided worng info", type: "error"});
   } else {
      var newPerson = new Person({
         name: personInfo.name,
         age: personInfo.age,
         nationality: personInfo.nationality
      });

      newPerson.save(function(err, Person){
         if(err)
            res.render('show_message', {message: "Database error", type: "error"});
         else
            res.render('show_message', {
               message: "New person added", type: "success", person: personInfo});
      });
   }
});
在上面的代码中,如果我们收到任何空字段或没有收到任何字段,我们将发送错误响应。但是,如果我们收到格式正确的文档,则可以从Person模型创建一个newPerson文档,并使用newPerson.save()函数将其保存到数据库中。它在Mongoose中定义,并接受回调作为参数。该回调有2个参数-错误和响应。这些参数将呈现show_message视图。
要显示此路线的响应,我们还需要创建一个show_message视图。使用以下代码创建新视图-
html
   head
      title Person
   body
      if(type == "error")
         h3(style = "color:red") #{message}
      else
         h3 New person,
            name: #{person.name},
            age: #{person.age} and
            nationality: #{person.nationality} added!
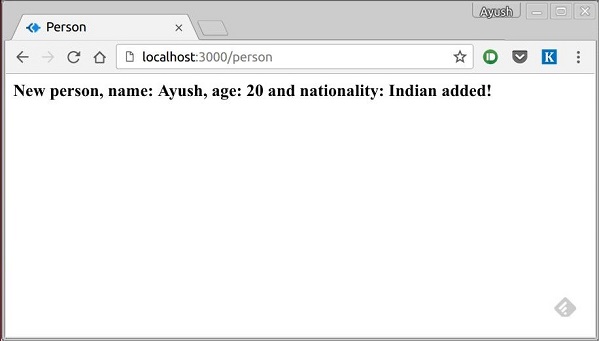
成功提交表单(show_message.pug)后,我们将收到以下回复:
现在,我们有了创建人员的界面。
检索文件
猫鼬提供了许多用于检索文档的功能,我们将重点介绍其中的三个。所有这些函数还将回调作为最后一个参数,就像save函数,它们的参数是error和response。这三个功能如下-
Model.find(条件,回调)
此函数查找与conditions对象中的字段匹配的所有文档。 Mongo中使用的相同运算符也可以在猫鼬中工作。例如,
Person.find(function(err, response){
   console.log(response);
});
这将从该人的收藏集中获取所有文档。
Person.find({name: "Ayush", age: 20},
   function(err, response){
      console.log(response);
});
这将获取字段名称为“ Ayush”且年龄为20的所有文档。
我们还可以提供所需的投影,即所需的字段。例如,如果我们只想要国籍为“印度”的人的姓名,则使用-
Person.find({nationality: "Indian"}, "name", function(err, response){
   console.log(response);
});
Model.findOne(条件,回调)
此函数始终获取单个,最相关的文档。它具有与Model.find()相同的参数。
Model.findById(id,回调)
此函数将_id (由mongo定义)作为第一个参数,使用可选的投影字符串和用于处理响应的回调。例如,
Person.findById("507f1f77bcf86cd799439011", function(err, response){
   console.log(response);
});
现在让我们创建一条路线来查看所有人员记录-
var express = require('express');
var app = express();

var mongoose = require('mongoose');
mongoose.connect('mongodb://localhost/my_db');

var personSchema = mongoose.Schema({
   name: String,
   age: Number,
   nationality: String
});

var Person = mongoose.model("Person", personSchema);

app.get('/people', function(req, res){
   Person.find(function(err, response){
      res.json(response);
   });
});

app.listen(3000);
更新文件
猫鼬提供3种功能来更新文档。功能描述如下-
Model.update(条件,更新,回调)
此函数接受条件并更新一个对象作为输入,并将更改应用于与集合中的条件匹配的所有文档。例如,以下代码将更新所有“个人”文档中的国籍“ American”-
Person.update({age: 25}, {nationality: "American"}, function(err, response){
   console.log(response);
});
Model.findOneAndUpdate(条件,更新,回调)
它根据查询找到一个文档,并根据第二个参数对其进行更新。它还将回调作为最后一个参数。让我们执行以下示例以了解函数
Person.findOneAndUpdate({name: "Ayush"}, {age: 40}, function(err, response) {
   console.log(response);
});
Model.findByIdAndUpdate(id,更新,回调)
此函数更新由其ID标识的单个文档。例如,
Person.findByIdAndUpdate("507f1f77bcf86cd799439011", {name: "James"},
   function(err, response){
      console.log(response);
});
现在让我们创建一条更新人员的路线。这将是一条以id为参数的PUT路由,并在有效负载中提供详细信息。
var express = require('express');
var app = express();

var mongoose = require('mongoose');
mongoose.connect('mongodb://localhost/my_db');

var personSchema = mongoose.Schema({
   name: String,
   age: Number,
   nationality: String
});

var Person = mongoose.model("Person", personSchema);

app.put('/people/:id', function(req, res){
   Person.findByIdAndUpdate(req.params.id, req.body, function(err, response){
      if(err) res.json({message: "Error in updating person with id " + req.params.id});
      res.json(response);
   });
});

app.listen(3000);
要测试此路线,请在终端中输入以下内容(用创建的人的ID替换ID)-
curl -X PUT --data "name = James&age = 20&nationality = American
"http://localhost:3000/people/507f1f77bcf86cd799439011
这将使用上述详细信息更新与路线中提供的ID相关联的文档。
删除文件
我们已经介绍了Create,Read和Update ,现在我们将了解如何使用Mongoose删除文档。我们这里有3个功能,就像更新一样。
Model.remove(条件,[回调])
此函数将条件对象作为输入,并删除所有与条件匹配的文档。例如,如果我们需要删除所有20岁的人,请使用以下语法-
Person.remove({age:20});
Model.findOneAndRemove(condition,[callback])
此功能根据条件对象删除单个,最相关的文档。让我们执行以下代码来理解它们。
Person.findOneAndRemove({name: "Ayush"});
Model.findByIdAndRemove(id,[callback])
此函数删除由其ID标识的单个文档。例如,
Person.findByIdAndRemove("507f1f77bcf86cd799439011");现在让我们创建一条从数据库中删除人员的路线。
var express = require('express');
var app = express();

var mongoose = require('mongoose');
mongoose.connect('mongodb://localhost/my_db');

var personSchema = mongoose.Schema({
   name: String,
   age: Number,
   nationality: String
});

var Person = mongoose.model("Person", personSchema);

app.delete('/people/:id', function(req, res){
   Person.findByIdAndRemove(req.params.id, function(err, response){
      if(err) res.json({message: "Error in deleting record id " + req.params.id});
      else res.json({message: "Person with id " + req.params.id + " removed."});
   });
});

app.listen(3000);
要检查输出,请使用以下curl命令-
curl -X DELETE http://localhost:3000/people/507f1f77bcf86cd799439011
这将删除具有给定id的人,并产生以下消息-
{message: "Person with id 507f1f77bcf86cd799439011 removed."}
这总结了我们如何使用MongoDB,Mongoose和Express创建简单的CRUD应用程序。要进一步探索猫鼬,请阅读API文档。