- 如何显示书签栏 (1)
- GWT安装
- GWT安装(1)
- 如何显示书签栏 - 无论代码示例
- 创建和编辑书签
- 创建和编辑书签(1)
- GWT与React(1)
- GWT与React
- GWT测试(1)
- GWT测试
- 书签外部文件 (1)
- GWT JSON
- GWT JSON(1)
- linux 书签命令 - Shell-Bash (1)
- GWT-应用程序
- GWT-应用程序(1)
- GWT数据库
- GWT数据库(1)
- GWT教程
- GWT教程(1)
- linux 书签命令 - Shell-Bash 代码示例
- android studio 数字书签 (1)
- Eclipse-添加书签
- Eclipse-添加书签(1)
- GWT简介(1)
- GWT简介
- Visual Studio 书签行 (1)
- 讨论GWT
- GWT XML
📅 最后修改于: 2020-10-25 04:46:55 🧑 作者: Mango
GWT支持使用“历史记录”类管理浏览器历史记录,您可以参考“ GWT-历史记录类”一章。
GWT使用术语令牌,该令牌只是应用程序可以解析以返回特定状态的字符串。应用程序会将此标记作为URL片段保存在浏览器的历史记录中。
在GWT-历史记录类别一章中,我们通过编写代码来处理历史记录中的令牌创建和设置。
在本文中,我们将讨论一个特殊的小部件Hyperlink,它自动为我们执行令牌创建和历史记录管理,并提供书签应用程序功能。
书签示例
本示例将带您通过简单的步骤演示GWT应用程序的书签。
以下步骤更新我们在GWT-创建应用程序一章中创建的GWT应用程序–
| Step | Description |
|---|---|
| 1 | Create a project with a name HelloWorld under a package com.tutorialspoint as explained in the GWT – Create Application chapter. |
| 2 | Modify HelloWorld.gwt.xml, HelloWorld.css, HelloWorld.html and HelloWorld.java as explained below. Keep rest of the files unchanged. |
| 3 | Compile and run the application to verify the result of the implemented logic. |
以下是修改后的模块描述符src / com.tutorialspoint / HelloWorld.gwt.xml的内容。
以下是修改后的样式表文件war / HelloWorld.css的内容。
body {
   text-align: center;
   font-family: verdana, sans-serif;
}

h1 {
   font-size: 2em;
   font-weight: bold;
   color: #777777;
   margin: 40px 0px 70px;
   text-align: center;
}
以下是修改后的HTML主机文件war / HelloWorld.html的内容
Hello World


       Bookmarking Demonstration
让我们拥有Java文件src / com.tutorialspoint / HelloWorld.java的以下内容,我们将使用这些内容演示GWT代码中的书签。
package com.tutorialspoint.client;
import com.google.gwt.core.client.EntryPoint;
import com.google.gwt.event.logical.shared.ValueChangeEvent;
import com.google.gwt.event.logical.shared.ValueChangeHandler;
import com.google.gwt.user.client.History;
import com.google.gwt.user.client.ui.HTML;
import com.google.gwt.user.client.ui.HorizontalPanel;
import com.google.gwt.user.client.ui.Hyperlink;
import com.google.gwt.user.client.ui.RootPanel;
import com.google.gwt.user.client.ui.TabPanel;
import com.google.gwt.user.client.ui.VerticalPanel;
public class HelloWorld implements EntryPoint {
private TabPanel tabPanel;
private void selectTab(String historyToken){
/* parse the history token */
try {
if (historyToken.substring(0, 9).equals("pageIndex")) {
String tabIndexToken = historyToken.substring(9, 10);
int tabIndex = Integer.parseInt(tabIndexToken);
/* Select the specified tab panel */
tabPanel.selectTab(tabIndex);
} else {
tabPanel.selectTab(0);
}
} catch (IndexOutOfBoundsException e) {
tabPanel.selectTab(0);
}
}
/**
* This is the entry point method.
*/
public void onModuleLoad() {
/* create a tab panel to carry multiple pages */
tabPanel = new TabPanel();
/* create pages */
HTML firstPage = new HTML("We are on first Page.
");
HTML secondPage = new HTML("We are on second Page.
");
HTML thirdPage = new HTML("We are on third Page.
");
String firstPageTitle = "First Page";
String secondPageTitle = "Second Page";
String thirdPageTitle = "Third Page";
Hyperlink firstPageLink = new Hyperlink("1", "pageIndex0");
Hyperlink secondPageLink = new Hyperlink("2", "pageIndex1");
Hyperlink thirdPageLink = new Hyperlink("3", "pageIndex2");
HorizontalPanel linksHPanel = new HorizontalPanel();
linksHPanel.setSpacing(10);
linksHPanel.add(firstPageLink);
linksHPanel.add(secondPageLink);
linksHPanel.add(thirdPageLink);
/* If the application starts with no history token,
redirect to a pageIndex0 */
String initToken = History.getToken();
if (initToken.length() == 0) {
History.newItem("pageIndex0");
initToken = "pageIndex0";
}
tabPanel.setWidth("400");
/* add pages to tabPanel*/
tabPanel.add(firstPage, firstPageTitle);
tabPanel.add(secondPage,secondPageTitle);
tabPanel.add(thirdPage, thirdPageTitle);
/* add value change handler to History
* this method will be called, when browser's Back button
* or Forward button are clicked.
* and URL of application changes.
* */
History.addValueChangeHandler(new ValueChangeHandler() {
@Override
public void onValueChange(ValueChangeEvent event) {
selectTab(event.getValue());
}
});
selectTab(initToken);
VerticalPanel vPanel = new VerticalPanel();
vPanel.setSpacing(10);
vPanel.add(tabPanel);
vPanel.add(linksHPanel);
/* add controls to RootPanel */
RootPanel.get().add(vPanel);
}
}
准备好所有更改后,让我们像在GWT-创建应用程序一章中那样,以开发模式编译和运行应用程序。如果您的应用程序一切正常,这将产生以下结果-
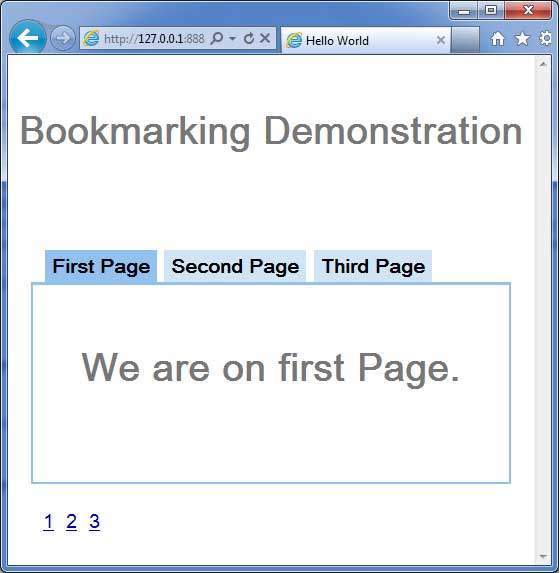
-
现在单击1、2或3。您会注意到选项卡随索引而变化。
-
您应该注意到,当您单击1,2或3时,应用程序URL发生了更改,并且#pageIndex已添加到该URL中
-
您还可以看到浏览器的后退和前进按钮现已启用。
-
使用浏览器的前进和后退按钮,您将看到相应地选择了不同的选项卡。
-
右键单击1、2或3。您可以看到诸如打开,在新窗口中打开,在新选项卡中打开,添加到收藏夹等选项。
-
右键单击3.选择“添加到收藏夹”。将书签另存为页面3。
-
打开收藏夹并选择第3页。您将看到第三个选项卡。