- GWT-应用程序(1)
- GWT-应用程序
- 第一个GWT应用程序
- 部署节点应用程序(1)
- 部署节点应用程序
- Web 应用程序的部署 (1)
- 应用程序,资源和部署
- 应用程序,资源和部署(1)
- 部署反应应用程序 - Javascript (1)
- 部署 Node.js 应用程序
- 部署 Node.js 应用程序(1)
- 部署反应应用程序 - Javascript 代码示例
- GWT安装
- GWT安装(1)
- Flex-部署应用程序
- Web 应用程序的部署 - 任何代码示例
- 部署示例 (1)
- Kubernetes-应用程序部署(1)
- Kubernetes-应用程序部署
- GWT与React(1)
- GWT与React
- Ant-部署应用程序(1)
- Ant-部署应用程序
- GWT测试
- GWT测试(1)
- GWT JSON(1)
- GWT JSON
- GWT数据库(1)
- GWT数据库
📅 最后修改于: 2020-10-25 04:37:21 🧑 作者: Mango
本教程将向您介绍如何创建应用程序“ war”文件以及如何在Apache Tomcat Websever根目录中部署该文件。
如果您理解了这个简单的示例,那么您将能够按照相同的步骤部署复杂的GWT应用程序。
让我们使用Eclipse IDE和GWT插件,并按照以下步骤创建GWT应用程序-
| Step | Description | 1 | Create a project with a name HelloWorld under a package com.tutorialspoint as explained in the GWT – Create Application chapter. |
|---|---|
| 2 | Modify HelloWorld.gwt.xml, HelloWorld.css, HelloWorld.html and HelloWorld.java as explained below. Keep rest of the files unchanged. |
| 3 | Compile and run the application to make sure business logic is working as per the requirements. |
| 4 | Finally, zip the content of the war folder of the application in the form of war file and deploy it in Apache Tomcat Webserver. |
| 5 | Launch your web application using appropriate URL as explained below in the last step. |
以下是修改后的模块描述符src / com.tutorialspoint / HelloWorld.gwt.xml的内容。
以下是修改后的样式表文件war / HelloWorld.css的内容。
body {
   text-align: center;
   font-family: verdana, sans-serif;
}

h1 {
   font-size: 2em;
   font-weight: bold;
   color: #777777;
   margin: 40px 0px 70px;
   text-align: center;
}
以下是修改后的HTML主机文件war / HelloWorld.html的内容。
Hello World


      Hello World
我从上一个示例中修改了HTML。在这里,我创建了一个占位符
package com.tutorialspoint.client;
import com.google.gwt.core.client.EntryPoint;
import com.google.gwt.user.client.ui.HTML;
import com.google.gwt.user.client.ui.RootPanel;
public class HelloWorld implements EntryPoint {
public void onModuleLoad() {
HTML html = new HTML("Welcome to GWT application
");
RootPanel.get("gwtContainer").add(html);
}
}
在这里,我们基于基本的widgest HTML创建并将其添加到具有id =“ gwtContainer”的div标签中。在接下来的章节中,我们将研究不同的GWT小部件。
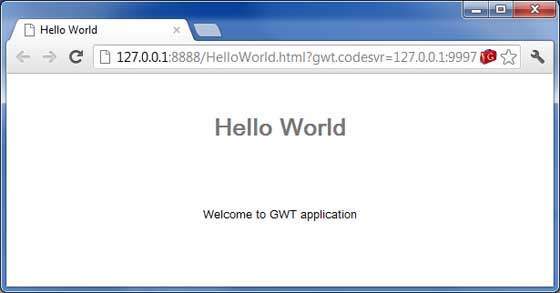
准备好所有更改后,让我们像在GWT-创建应用程序一章中那样,以开发模式编译和运行应用程序。如果您的应用程序一切正常,这将产生以下结果-
创建WAR文件
现在我们的应用程序可以正常工作了,我们准备将其导出为战争文件。
请按照以下步骤-
-
进入项目的war目录C:\ workspace \ HelloWorld \ war
-
选择war目录中可用的所有文件和文件夹。
-
将所有选定的文件和文件夹压缩为一个名为HelloWorld.zip的文件。
-
将HelloWorld.zip重命名为HelloWorld.war 。
部署WAR文件
-
停止tomcat服务器。
-
将HelloWorld.war文件复制到tomcat安装目录> webapps文件夹。
-
启动tomcat服务器。
-
在webapps目录中查看,应该创建了一个helloworld文件夹。
-
现在,HelloWorld.war已成功部署在Tomcat Web服务器根目录中。
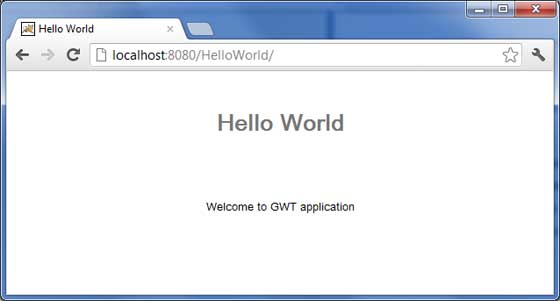
运行应用程序
在Web浏览器中输入一个URL: http:// localhost:8080 / HelloWorld以启动该应用程序
服务器名称(localhost)和端口(8080)可能会因您的tomcat配置而异。