- 讨论JSF
- JSF-概述
- JSF-概述(1)
- JSF-Ajax(1)
- JSF-Ajax
- JSF-数据表(1)
- JSF-数据表
- 用Python创建你的第一个应用程序
- JSF-生命周期(1)
- JSF-生命周期
- JSF-环境设置(1)
- JSF-环境设置
- JSF-体系结构(1)
- JSF-体系结构
- flutter,你的第一个应用程序 (1)
- JSF-验证器标签
- JSF-验证器标签(1)
- cookie jsf - Java (1)
- GWT与JSF(1)
- GWT与JSF
- JSF-基本标签(1)
- JSF-基本标签
- JSF-页面导航(1)
- JSF-页面导航
- cookie jsf - Java 代码示例
- Node.js-第一个应用程序(1)
- Node.js-第一个应用程序
- Node.js 第一个应用程序
- Node.js 第一个应用程序(1)
📅 最后修改于: 2020-10-23 06:42:59 🧑 作者: Mango
为了创建一个简单的JSF应用程序,我们将使用maven-archetype-webapp插件。在下面的示例中,我们将在C:\ JSF文件夹中创建一个基于Maven的Web应用程序项目。
建立专案
让我们打开命令控制台,进入C:\> JSF目录并执行以下mvn命令。
C:\JSF>mvn archetype:create
-DgroupId = com.tutorialspoint.test
-DartifactId = helloworld
-DarchetypeArtifactId = maven-archetype-webapp
Maven将开始处理并将创建完整的Java Web应用程序项目结构。
[INFO] Scanning for projects...
[INFO] Searching repository for plugin with prefix: 'archetype'.
[INFO] -------------------------------------------------------------
[INFO] Building Maven Default Project
[INFO]    task-segment: [archetype:create] (aggregator-style)
[INFO] -------------------------------------------------------------
[INFO] [archetype:create {execution: default-cli}]
[INFO] Defaulting package to group ID: com.tutorialspoint.test
[INFO] artifact org.apache.maven.archetypes:maven-archetype-webapp:
checking for updates from central
[INFO] -------------------------------------------------------------
[INFO] Using following parameters for creating project
from Old (1.x) Archetype: maven-archetype-webapp:RELEASE
[INFO] -------------------------------------------------------------
[INFO] Parameter: groupId, Value: com.tutorialspoint.test
[INFO] Parameter: packageName, Value: com.tutorialspoint.test
[INFO] Parameter: package, Value: com.tutorialspoint.test
[INFO] Parameter: artifactId, Value: helloworld
[INFO] Parameter: basedir, Value: C:\JSF
[INFO] Parameter: version, Value: 1.0-SNAPSHOT
[INFO] project created from Old (1.x) Archetype in dir:
C:\JSF\helloworld
[INFO] -------------------------------------------------------------
[INFO] BUILD SUCCESSFUL
[INFO] -------------------------------------------------------------
[INFO] Total time: 7 seconds
[INFO] Finished at: Mon Nov 05 16:05:04 IST 2012
[INFO] Final Memory: 12M/84M
[INFO] -------------------------------------------------------------
现在转到C:/ JSF目录。您将看到一个创建的Java Web应用程序项目,名为helloworld(在artifactId中指定)。 Maven使用标准的目录布局,如以下屏幕截图所示。
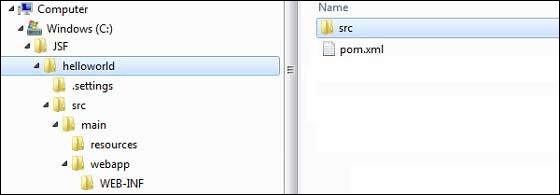
使用上面的示例,我们可以了解以下关键概念。
| S.No | Folder Structure & Description |
|---|---|
| 1 |
helloworld Contains src folder and pom.xml |
| 2 |
src/main/wepapp Contains WEB-INF folder and index.jsp page |
| 3 |
src/main/resources It contains images/properties files (In the above example, we need to create this structure manually) |
为项目添加JSF功能
添加以下JSF依赖项。
      com.sun.faces
      jsf-api
      2.1.7


      com.sun.faces
      jsf-impl
      2.1.7
完整的POM.xml
   4.0.0
   com.tutorialspoint.test
   helloworld
   war
   1.0-SNAPSHOT
   helloworld Maven Webapp
   http://maven.apache.org


         junit
         junit
         3.8.1
         test


         com.sun.faces
         jsf-api
         2.1.7


         com.sun.faces
         jsf-impl
         2.1.7


      helloworld


            org.apache.maven.plugins
            maven-compiler-plugin
            2.3.1


               1.6
               1.6
准备Eclipse项目
让我们打开命令控制台。转到C:\> JSF> helloworld目录,然后执行以下mvn命令。
C:\JSF\helloworld>mvn eclipse:eclipse -Dwtpversion = 2.0
Maven将开始处理,创建Eclipse准备项目,并将添加wtp功能。
Downloading: http://repo.maven.apache.org/org/apache/maven/plugins/
maven-compiler-plugin/2.3.1/maven-compiler-plugin-2.3.1.pom
5K downloaded  (maven-compiler-plugin-2.3.1.pom)
Downloading: http://repo.maven.apache.org/org/apache/maven/plugins/
maven-compiler-plugin/2.3.1/maven-compiler-plugin-2.3.1.jar
29K downloaded  (maven-compiler-plugin-2.3.1.jar)
[INFO] Searching repository for plugin with prefix: 'eclipse'.
[INFO] ------------------------------------------------------------
[INFO] Building helloworld Maven Webapp
[INFO]    task-segment: [eclipse:eclipse]
[INFO] ------------------------------------------------------------
[INFO] Preparing eclipse:eclipse
[INFO] No goals needed for project - skipping
[INFO] [eclipse:eclipse {execution: default-cli}]
[INFO] Adding support for WTP version 2.0.
[INFO] Using Eclipse Workspace: null
[INFO] Adding default classpath container: org.eclipse.jdt.
launching.JRE_CONTAINER
Downloading: http://repo.maven.apache.org/
com/sun/faces/jsf-api/2.1.7/jsf-api-2.1.7.pom
12K downloaded  (jsf-api-2.1.7.pom)
Downloading: http://repo.maven.apache.org/
com/sun/faces/jsf-impl/2.1.7/jsf-impl-2.1.7.pom
10K downloaded  (jsf-impl-2.1.7.pom)
Downloading: http://repo.maven.apache.org/
com/sun/faces/jsf-api/2.1.7/jsf-api-2.1.7.jar
619K downloaded  (jsf-api-2.1.7.jar)
Downloading: http://repo.maven.apache.org/
com/sun/faces/jsf-impl/2.1.7/jsf-impl-2.1.7.jar
1916K downloaded  (jsf-impl-2.1.7.jar)
[INFO] Wrote settings to C:\JSF\helloworld\.settings\
org.eclipse.jdt.core.prefs
[INFO] Wrote Eclipse project for "helloworld" to C:\JSF\helloworld.
[INFO]
[INFO] -----------------------------------------------------------
[INFO] BUILD SUCCESSFUL
[INFO] -----------------------------------------------------------
[INFO] Total time: 6 minutes 7 seconds
[INFO] Finished at: Mon Nov 05 16:16:25 IST 2012
[INFO] Final Memory: 10M/89M
[INFO] -----------------------------------------------------------
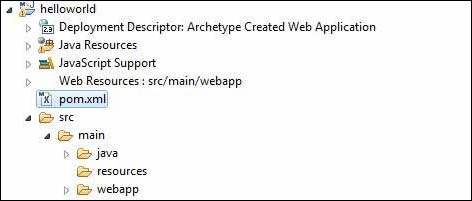
在Eclipse中导入项目
以下是步骤-
-
使用导入向导在Eclipse中导入项目。
-
转到文件→导入…→现有项目到工作区。
-
选择根目录到helloworld。
-
将“复制项目”保留到工作区中以进行检查。
-
单击完成按钮。
-
Eclipse将在其工作区C:\→Projects→Data→WorkSpace中导入并复制项目。
在web.xml中配置Faces Servlet
在webapp→WEB-INF文件夹中找到web.xml,如下所示进行更新。
      faces/home.xhtml


      Faces Servlet
      javax.faces.webapp.FacesServlet
      1


      Faces Servlet
      /faces/*


      Faces Servlet
      *.jsf


      Faces Servlet
      *.faces


      Faces Servlet
      *.xhtml
创建一个托管Bean
在src→main→java as com→tutorialspoint→test下创建一个包结构。在此程序包中创建HelloWorld.java类。如下所示更新HelloWorld.java的代码。
package com.tutorialspoint.test;

import javax.faces.bean.ManagedBean;

@ManagedBean(name = "helloWorld", eager = true)
public class HelloWorld {

   public HelloWorld() {
      System.out.println("HelloWorld started!");
   }

   public String getMessage() {
      return "Hello World!";
   }
}
创建一个JSF页面
在webapp文件夹下创建一个页面home.xhtml。如下所示更新home.xhtml的代码。
JSF Tutorial!


      #{helloWorld.getMessage()}
建立项目
以下是步骤。
-
在Eclipse中选择helloworld项目
-
使用运行方式向导
-
选择运行方式→Maven软件包
-
Maven将开始构建项目,并将在C:\→项目→数据→工作区→helloworld→目标文件夹下创建helloworld.war。
[INFO] Scanning for projects...
[INFO] -----------------------------------------------------
[INFO] Building helloworld Maven Webapp
[INFO]
[INFO] Id: com.tutorialspoint.test:helloworld:war:1.0-SNAPSHOT
[INFO] task-segment: [package]
[INFO] -----------------------------------------------------
[INFO] [resources:resources]
[INFO] Using default encoding to copy filtered resources.
[INFO] [compiler:compile]
[INFO] Nothing to compile - all classes are up to date
[INFO] [resources:testResources]
[INFO] Using default encoding to copy filtered resources.
[INFO] [compiler:testCompile]
[INFO] No sources to compile
[INFO] [surefire:test]
[INFO] Surefire report directory:
C:\Projects\Data\WorkSpace\helloworld\target\surefire-reports

-------------------------------------------------------
 T E S T S
-------------------------------------------------------
There are no tests to run.

Results :

Tests run: 0, Failures: 0, Errors: 0, Skipped: 0

[INFO] [war:war]
[INFO] Packaging webapp
[INFO] Assembling webapp[helloworld] in
[C:\Projects\Data\WorkSpace\helloworld\target\helloworld]
[INFO] Processing war project
[INFO] Webapp assembled in[150 msecs]
[INFO] Building war:
C:\Projects\Data\WorkSpace\helloworld\target\helloworld.war
[INFO] ------------------------------------------------
[INFO] BUILD SUCCESSFUL
[INFO] ------------------------------------------------
[INFO] Total time: 3 seconds
[INFO] Finished at: Mon Nov 05 16:34:46 IST 2012
[INFO] Final Memory: 2M/15M
[INFO] ------------------------------------------------
部署WAR文件
以下是步骤。
-
停止tomcat服务器。
-
将helloworld.war文件复制到tomcat安装目录→webapps文件夹。
-
启动tomcat服务器。
-
在webapps目录中查看,应该创建了一个helloworld文件夹。
-
现在helloworld.war已成功部署在Tomcat Web服务器根目录中。
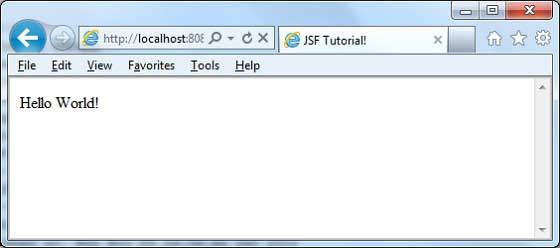
运行应用程序
在Web浏览器中输入一个URL: http:// localhost:8080 / helloworld / home.jsf以启动该应用程序。
服务器名称(localhost)和端口(8080)可能会因您的tomcat配置而异。