- symfony 安装原则 - Shell-Bash 代码示例
- orm (1)
- orm - PHP (1)
- symfony (1)
- orm - 任何代码示例
- orm - PHP 代码示例
- symfony 设置时区 (1)
- symfony - 任何代码示例
- Symfony-安装
- Symfony-安装(1)
- django orm - Python 代码示例
- 关键原则
- 关键原则(1)
- symfony - Shell-Bash (1)
- express orm - Javascript (1)
- symfony - Shell-Bash 代码示例
- express orm - Javascript 代码示例
- Symfony-组件(1)
- Symfony-组件
- 什么是 django orm - Python (1)
- django orm 时间戳字段 - Python (1)
- symfony 5 安装 - PHP (1)
- Symfony-验证(1)
- Symfony-验证
- Symfony教程
- Symfony教程(1)
- symfony 密码 (1)
- symfony 请求 (1)
- Symfony-简介
📅 最后修改于: 2020-10-19 03:17:07 🧑 作者: Mango
在Symfony Web框架中,模型扮演着重要角色。他们是业务实体。它们可以由客户提供,也可以从后端数据库中获取,然后根据业务规则进行操作并保存回数据库中。它们是视图提供的数据。在本章中,让我们了解模型以及它们如何与后端系统交互。
数据库模型
我们需要将模型映射到后端关系数据库项,以安全有效地获取和保留模型。可以使用对象关系映射(ORM)工具完成此映射。 Symfony提供了一个单独的捆绑包DoctrineBundle ,该捆绑包将Symfony与第三方PHP数据库ORM工具Doctrine集成在一起。
主义ORM
默认情况下,Symfony框架不提供任何与数据库一起使用的组件。但是,它与Doctrine ORM紧密集成。教义包含几个用于数据库存储和对象映射的PHP库。
以下示例将帮助您了解Doctrine的工作原理,如何配置数据库以及如何保存和检索数据。
原则ORM示例
在此示例中,我们将首先配置数据库并创建一个Student对象,然后在其中执行一些操作。
为此,我们需要遵循以下步骤。
步骤1:创建一个Symfony应用程序
使用以下命令创建一个Symfony应用程序dbsample 。
symfony new dbsample
步骤2:配置数据库
通常,数据库信息在“ app / config / parameters.yml”文件中进行配置。
打开文件并添加以下更改。
parameter.yml
parameters:
   database_host: 127.0.0.1
   database_port: null
   database_name: studentsdb
   database_user:
   database_password:
   mailer_transport: smtp
   mailer_host: 127.0.0.1
   mailer_user: null
   mailer_password: null
   secret: 037ab82c601c10402408b2b190d5530d602b5809

   doctrine:
      dbal:
      driver:   pdo_mysql
      host:     '%database_host%'
      dbname:   '%database_name%'
      user:     '%database_user%'
      password: '%database_password%'
      charset: utf8mb4
现在,Doctrine ORM可以连接到数据库。
步骤3:建立资料库
发出以下命令以生成“ studentsdb”数据库。此步骤用于在Doctrine ORM中绑定数据库。
php bin/console doctrine:database:create
执行命令后,它将自动生成一个空的“ studentsdb”数据库。您可以在屏幕上看到以下响应。
Created database `studentsdb` for connection named default
步骤4:地图资讯
映射信息不过是“元数据”,它是一组规则的集合,这些规则可以准确地告知Doctrine ORM如何将Student类及其属性映射到特定的数据库表。
嗯,可以用多种不同的格式(包括YAML,XML)指定此元数据,也可以使用批注直接传递Student类。定义如下。
学生.php
在文件中添加以下更改。
在此,表名称是可选的。如果未指定表名,则将根据实体类的名称自动确定表名。
步骤5:绑定实体
教义为您创建简单的实体类。它可以帮助您建立任何实体。
发出以下命令以生成实体。
php bin/console doctrine:generate:entities AppBundle/Entity/Student
然后,您将看到以下结果,并且实体将被更新。
Generating entity "AppBundle\Entity\Student"
   > backing up Student.php to Student.php~
   > generating AppBundle\Entity\Student
学生.php
id;
   }

   /**
      * Set name
      *
      * @param string $name
      *
      * @return Student
   */

   public function setName($name) {
      $this->name = $name;
      return $this;
   }

   /**
      * Get name
      *
      * @return string
   */

   public function getName() {
      return $this->name;
   }

   /**
      * Set address
      *
      * @param string $address
      *
      * @return Student
   */

   public function setAddress($address) {
      $this->address = $address;
      return $this;
   }

   /**
      * Get address
      *
      * @return string
   */

   public function getAddress() {
      return $this->address;
   }
}
步骤6:地图验证
创建实体后,应使用以下命令验证映射。
php bin/console doctrine:schema:validate
它将产生以下结果-
[Mapping]  OK - The mapping files are correct.
[Database] FAIL - The database schema is not in sync with the current mapping file
由于尚未创建students表,因此该实体不同步。让我们在下一步中使用Symfony命令创建students表。
步骤7:创建模式
教义可以自动创建学生实体所需的所有数据库表。可以使用以下命令完成此操作。
php bin/console doctrine:schema:update --force
执行命令后,您可以看到以下响应。
Updating database schema...
Database schema updated successfully! "1" query was executed
该命令将数据库的外观与实际外观进行比较,并执行将数据库模式更新到应有的位置所需的SQL语句。
现在,再次使用以下命令验证架构。
php bin/console doctrine:schema:validate
它将产生以下结果-
[Mapping]  OK - The mapping files are correct.
[Database] OK - The database schema is in sync with the mapping files
步骤8:获取和设置
如在绑定实体部分中所示,以下命令生成Student类的所有getter和setter。
$ php bin/console doctrine:generate:entities AppBundle/Entity/Student
步骤9:将对象持久化到数据库
现在,我们已经将Student实体映射到其对应的Student表。现在,我们应该能够将Student对象持久化到数据库中。将以下方法添加到包的StudentController中。
StudentController.php
setName('Adam');
      $stud->setAddress('12 north street');
      $doct = $this->getDoctrine()->getManager();

      // tells Doctrine you want to save the Product
      $doct->persist($stud);

      //executes the queries (i.e. the INSERT query)
      $doct->flush();

      return new Response('Saved new student with id ' . $stud->getId());
   }
}
在这里,我们通过基本控制器的getDoctrine()使用getManager()方法访问了教义管理器,然后使用教义管理器的persist()方法持久化了当前对象。 persist()方法将命令添加到队列中,但是flush()方法却可以完成实际工作(保留学生对象)。
步骤10:从数据库中获取对象
在StudentController中创建一个函数,该函数将显示学生详细信息。
StudentController.php
/**
   * @Route("/student/display")
*/
public function displayAction() {
   $stud = $this->getDoctrine()
   ->getRepository('AppBundle:Student')
   ->findAll();
   return $this->render('student/display.html.twig', array('data' => $stud));
}
步骤11:创建视图
让我们创建一个指向显示动作的视图。移至views目录并创建文件“ display.html.twig”。在文件中添加以下更改。
display.html.twig
Students database application!
Name
Address
{% for x in data %}
{{ x.Name }}
{{ x.Address }}
{% endfor %}
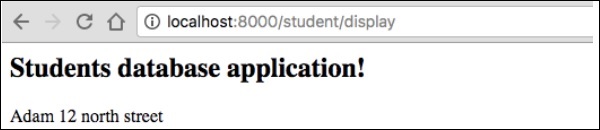
您可以通过在浏览器中请求URL“ http:// localhost:8000 / student / display”来获得结果。
它将在屏幕上产生以下输出-
步骤12:更新对象
要在StudentController中更新对象,请创建一个动作并添加以下更改。
/**
   * @Route("/student/update/{id}")
*/
public function updateAction($id) {
   $doct = $this->getDoctrine()->getManager();
   $stud = $doct->getRepository('AppBundle:Student')->find($id);

   if (!$stud) {
      throw $this->createNotFoundException(
         'No student found for id '.$id
      );
   }
   $stud->setAddress('7 south street');
   $doct->flush();

   return new Response('Changes updated!');
}
现在,请求URL“ http:// localhost:8000 / Student / update / 1”,它将产生以下结果。
它将在屏幕上产生以下输出-

步骤13:删除对象
删除对象是相似的,它需要调用实体(主义)管理器的remove()方法。
可以使用以下命令完成此操作。
/**
   * @Route("/student/delete/{id}")
*/
public function deleteAction($id) {
   $doct = $this->getDoctrine()->getManager();
   $stud = $doct->getRepository('AppBundle:Student')->find($id);

   if (!$stud) {
      throw $this->createNotFoundException('No student found for id '.$id);
   }

   $doct->remove($stud);
   $doct->flush();

   return new Response('Record deleted!');
}