Dart是一种客户端优化的编程语言,支持多平台应用程序开发、格式化、分析和测试代码等各个领域。它是一种编程语言,构成了Flutter 的基础。
Flutter是一个开源 UI – 软件开发工具包,可帮助在单个代码库中开发适用于 Android、iOS、Linux、Mac、Windows、Google Fuchsia 和 Web 的应用程序。
Visual Studio Code是微软为 Windows、Mac 和 Linux 开发的代码编辑器,具有代码调试、语法高亮、代码完成、代码重构等功能。
DartSDK
安装:
按照以下步骤安装dart SDK:
第一步:打开“获取Dart SDK ”网站。
步骤 2:向下滚动到网站底部,然后单击“将 SDK 下载为 zip 文件” 。
第 3 步:根据您设备的架构,相应地单击适用于 Windows 或 Mac 或 Linux 的“Dark SDK” 。
第 4 步:下载完成后,转到“下载”文件夹并解压缩新下载的 Dart-SDK zip 文件。
第 5 步:要解压缩文件,请右键单击该文件,然后单击“在此处提取” 。
第 6 步:现在,将在“下载”文件夹中创建一个新的“dart-sdk”文件夹。
步骤 7:复制此文件并将其粘贴到“C”盘的“Program Files”文件夹中。
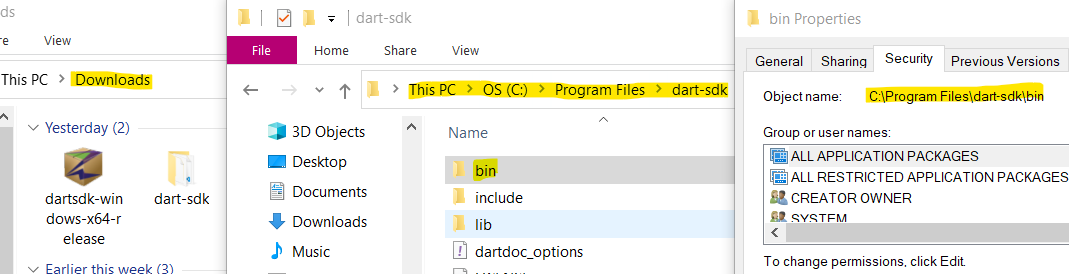
第八步:打开“dart-sdk”文件夹,你会发现一个名为“bin”的文件夹。
第 9 步:现在,右键单击“bin”文件夹并选择“属性”。
步骤10:在“bin Properties”窗口中,转到“Security”并复制“Object Name” ,也称为文件地址,然后按“Ok” 。
安装Dart SDK
设置:
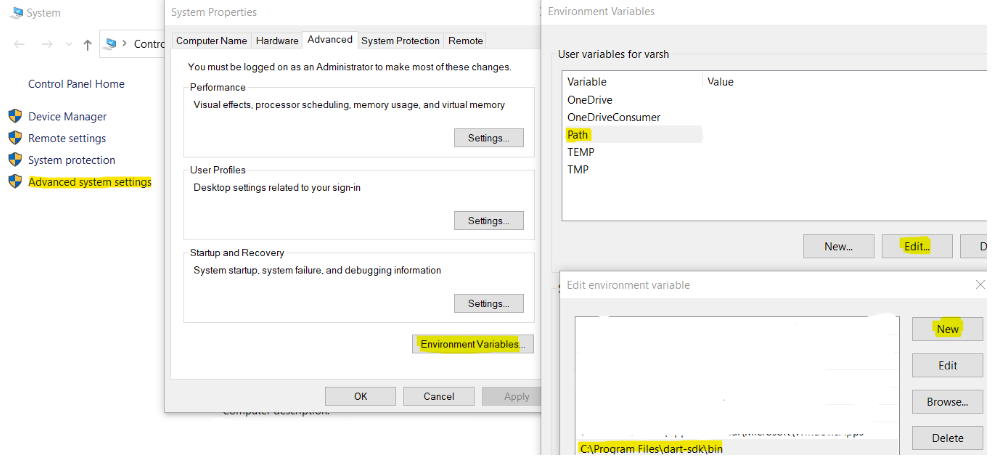
步骤11:打开“This PC”文件夹,在该文件夹内右击,选择“属性” 。
第 12 步:在“系统”窗口中,选择窗口左侧可用的“高级系统设置” 。
第 13 步:在“高级”选项卡中,按“环境变量…”按钮。
第 14 步:在“环境变量”窗口中,在“用户变量…”下检查“路径”变量。
步骤15:如果可用,则按“编辑”按钮,在“编辑环境变量”窗口中按“新建”按钮,将复制的地址添加到其中并保存所做的更改。
步骤16:如果不可用,则通过按“新建”按钮并输入“变量名称”作为“路径”和“变量值”作为复制的地址来创建一个,然后按“确定” 。
为Dart SDK 设置环境变量
第 17 步:现在打开命令提示符 (cmd) 并输入“dart” 。
第 18 步:输出如下。
Dart
╔════════════════════════════════════════════════════════════════════════════╗
  ║ The Dart tool uses Google Analytics to anonymously report feature usage    ║
  ║ statistics and to send basic crash reports. This data is used to help      ║
  ║ improve the Dart platform and tools over time.                             ║
  ║                                                                            ║
  ║ To disable reporting of anonymous analytics, run:                          ║
  ║                                                                            ║
  ║   dart --disable-analytics                                                 ║
  ║                                                                            ║
  ╚════════════════════════════════════════════════════════════════════════════╝

A command-line utility for Dart development.

Usage: dart []  []

Global options:
-h, --help                 Print this usage information.
-v, --verbose              Show additional command output.
    --version              Print the Dart SDK version.
    --enable-analytics     Enable anonymous analytics.
    --disable-analytics    Disable anonymous analytics.

Available commands:
  analyze   Analyze the project's Dart code.
  compile   Compile Dart to various formats.
  create    Create a new project.
  fix       Apply automated fixes to Dart source code.
  format    Idiomatically format Dart source code.
  migrate   Perform a null safety migration on a project or package.
  pub       Work with packages.
  run       Run a Dart program.
  test      Run tests in this package.

Run "dart help " for more information about a command.
See https://dart.dev/tools/dart-tool for detailed documentation.
Dart
void main() {
  print("Welcome to GeeksforGeeks!");
}
Dart
{
    // Use IntelliSense to learn about possible attributes.
    // Hover to view descriptions of existing attributes.
    // For more information, visit: https://go.microsoft.com/fwlink/?linkid=830387
    "version": "0.2.0",
    "configurations": [
        {
            "name": "Dart & Flutter",
            "request": "launch",
            "type": "dart",
            "program" : "gfg.dart"
        }
    ]
}
Dart
Welcome to GeeksforGeeks!
Exited
Dart
PS C:\Users\name\Dart> dart gfg.dart
Welcome to GeeksforGeeks!
第 19 步:如果您的输出与上面一样,则表示dart已成功安装。
视觉工作室代码
安装:
按照以下步骤在 VS Code 中设置dart :
步骤 1:在您的设备中打开 Visual Studio Code。
Note: If unavailable then, open “Download Visual Studio Code” and download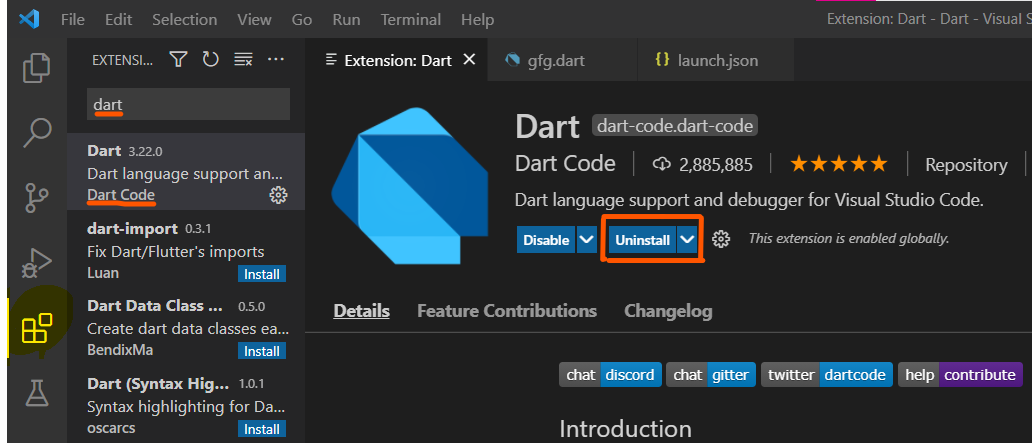
the application based on your device’s architecture and configurations.步骤2:按“Ctrl + B”并选择“扩展”或直接按“Ctrl + Shift + X” 。
第三步:在搜索栏中输入“dart ” ,打开列表中第一个以“ Dart Code”命名的“ Dart ”扩展。按“安装”按钮。
在 Visual Studio Code 中安装Dart
第四步:安装完成后,点击“文件”和“新建文件” 。
第 5 步:再次单击“文件” 、 “另存为”并使用“. dart”扩展名,如“gfg.dart”。这个文件应该保存在一个文件夹下,而不是一个松散的文件。因此,如果需要创建一个名为“Dart”的新文件夹并将这个新文件保存在该文件夹下。
现在,让我们编写我们的第一个Dart程序。
Dart
void main() {
  print("Welcome to GeeksforGeeks!");
}
第 6 步:上面的代码帮助我们打印字符串“Welcome to GeeksforGeeks!” .在编码区输入或复制以上代码。
第 7 步:通过按“Ctrl + S”或选择“文件”和“保存”来保存文件。
第 8 步:现在要运行代码,请按“Ctrl + Shift + D”并按“运行和调试”按钮或打开“运行”并选择“开始调试” 。
第 9 步:现在将创建一个名为“launch.json”的新文件,它会在 VS Code 中自动打开。
Dart
{
    // Use IntelliSense to learn about possible attributes.
    // Hover to view descriptions of existing attributes.
    // For more information, visit: https://go.microsoft.com/fwlink/?linkid=830387
    "version": "0.2.0",
    "configurations": [
        {
            "name": "Dart & Flutter",
            "request": "launch",
            "type": "dart",
            "program" : "gfg.dart"
        }
    ]
}
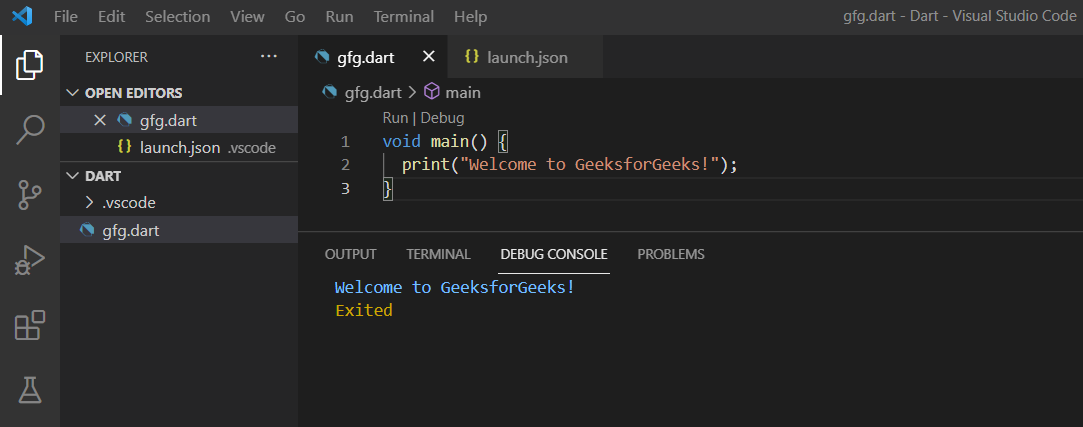
第 10 步:在“launch.json”文件中,在大括号 ({}) 内添加“program value” ,例如{“program” : “gfg.dart”}如上图 并保存文件。
Note: If needed add a “,” (comma), to the previous value of "program" in the code of “launch.json” file.第 11 步:现在,按“运行” ,然后单击“无需调试即可运行” 。 dart文件的输出将显示在“调试控制台”中。
Dart
Welcome to GeeksforGeeks!
Exited
第 12 步:现在要在终端中运行代码,请按“终端”并单击“新建终端” 。
第 13 步:现在在终端中,输入“dart file_name”,如“dart gfg”。 dart” ,然后按“Enter”。
第 14 步:文件的输出将显示在终端中。
Dart
PS C:\Users\name\Dart> dart gfg.dart
Welcome to GeeksforGeeks!
输出: