- WebRTC教程
- WebRTC教程(1)
- WebRTC 简介
- WebRTC 简介(1)
- 讨论WebRTC(1)
- 讨论WebRTC
- WebRTC-环境
- WebRTC-环境(1)
- WebRTC-概述(1)
- WebRTC-概述
- WebRTC-体系结构(1)
- WebRTC-体系结构
- 云计算安全性(1)
- 云计算安全性
- 应用程序安全性和网络安全性之间的区别
- 应用程序安全性和网络安全性之间的区别(1)
- 应用程序安全性和网络安全性之间的区别(1)
- 应用程序安全性和网络安全性之间的区别
- 软件安全性与网络安全性之间的区别
- 软件安全性与网络安全性之间的区别(1)
- 软件安全性与网络安全性之间的区别
- c# webrtc dll - C# (1)
- WebRTC-有用的资源
- WebRTC-有用的资源(1)
- c# webrtc dll - C# 代码示例
- Excel宏-安全性
- WebRTC-移动支持
- WebRTC-移动支持(1)
- WebRTC-发送消息
📅 最后修改于: 2020-10-17 05:51:36 🧑 作者: Mango
在本章中,我们将向在“ WebRTC信令”一章中创建的信令服务器添加安全功能。将有两个增强功能-
- 使用Redis数据库进行用户身份验证
- 启用安全的套接字连接
首先,您应该安装Redis。
-
从http://redis.io/download下载最新的稳定版本(以我的情况为3.05)
-
打开包装
-
在下载的文件夹中运行sudo make install
-
安装完成后,运行make test以检查一切是否正常。
Redis有两个可执行命令-
-
redis-cli -Redis的命令行界面(客户端部分)
-
redis-server -Redis数据存储
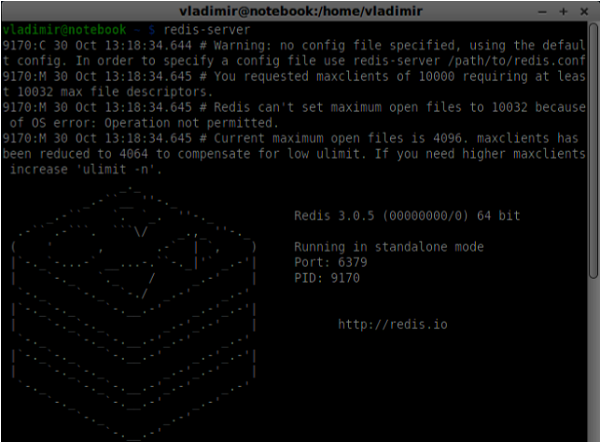
要运行Redis服务器,请在终端控制台中输入redis-server 。您应该看到以下内容-
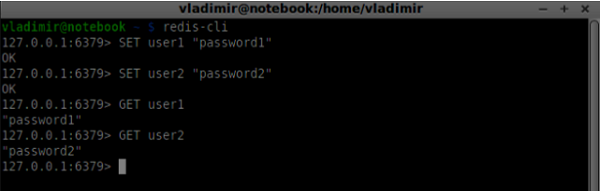
现在打开一个新的终端窗口,并运行redis-cli打开客户端应用程序。

基本上,Redis是一个键值数据库。要创建具有字符串值的键,应使用SET命令。要读取键值,您应该使用GET命令。让我们为其添加两个用户和密码。密钥将是用户名,这些密钥的值将是相应的密码。
现在,我们应该修改我们的信令服务器以添加用户身份验证。将以下代码添加到server.js文件的顶部-
//require the redis library in Node.js
var redis = require("redis");

//creating the redis client object
var redisClient = redis.createClient();
在上面的代码中,我们需要用于Node.js的Redis库并为我们的服务器创建一个Redis客户端。
要添加身份验证,请修改连接对象上的消息处理程序-
//when a user connects to our sever
wss.on('connection', function(connection) {
   console.log("user connected");

   //when server gets a message from a connected user
   connection.on('message', function(message) {

      var data;
      //accepting only JSON messages
      try {
         data = JSON.parse(message);
      } catch (e) {
         console.log("Invalid JSON");
         data = {};
      }

      //check whether a user is authenticated
      if(data.type != "login") {

         //if user is not authenticated
         if(!connection.isAuth) {
            sendTo(connection, {
               type: "error",
               message: "You are not authenticated"
            });
            return;
         }
      }

      //switching type of the user message
      switch (data.type) {
         //when a user tries to login
         case "login":
            console.log("User logged:", data.name);
            //get password for this username from redis database

            redisClient.get(data.name, function(err, reply) {
               //check if password matches with the one stored in redis
               var loginSuccess = reply === data.password;

               //if anyone is logged in with this username or incorrect password
                  then refuse
               if(users[data.name] || !loginSuccess) {
                  sendTo(connection, {
                     type: "login",
                     success: false
                  });
               } else {
                  //save user connection on the server
                  users[data.name] = connection;
                  connection.name = data.name;
                  connection.isAuth = true;

                  sendTo(connection, {
                     type: "login",
                     success: true
                  });
               }
            });

            break;
      }
   });

}

//...
//*****other handlers*******
在上面的代码中,如果用户尝试登录,我们将从Redis那里获取他的密码,检查它是否与存储的密码匹配,如果成功,我们将其用户名存储在服务器上。我们还将isAuth标志添加到连接中,以检查用户是否已通过身份验证。注意此代码-
//check whether a user is authenticated
if(data.type != "login") {

   //if user is not authenticated
   if(!connection.isAuth) {
      sendTo(connection, {
         type: "error",
         message: "You are not authenticated"
      });

      return;
   }
}
如果未经身份验证的用户尝试发送报价或退出连接,我们只需将错误发送回去。
下一步是启用安全的套接字连接。强烈建议将其用于WebRTC应用程序。 PKI(公钥基础结构)是来自CA(证书颁发机构)的数字签名。然后,用户检查用于签署证书的私钥是否与CA证书的公钥匹配。为了发展的目的。我们将使用自签名的安全证书。
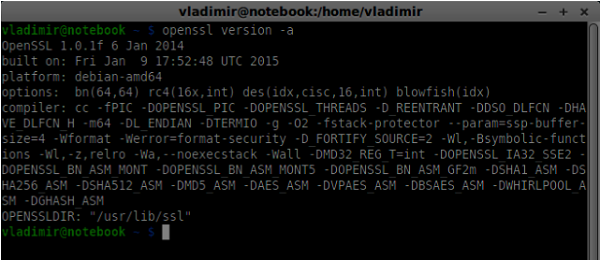
我们将使用openssl。它是一个开放源代码工具,可实现SSL(安全套接字层)和TLS(传输层安全性)协议。它通常默认安装在Unix系统上。运行openssl version -a检查是否已安装。
要生成公共和私有安全证书密钥,您应该遵循以下步骤-
-
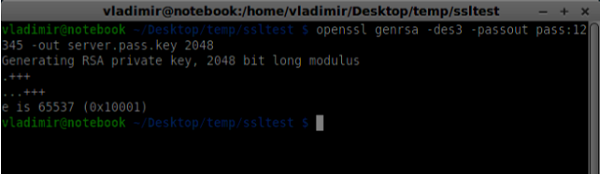
生成临时服务器密码密钥
openssl genrsa -des3 -passout pass:x -out server.pass.key 2048
-
生成服务器私钥
openssl rsa -passin pass:12345 -in server.pass.key -out server.key

-
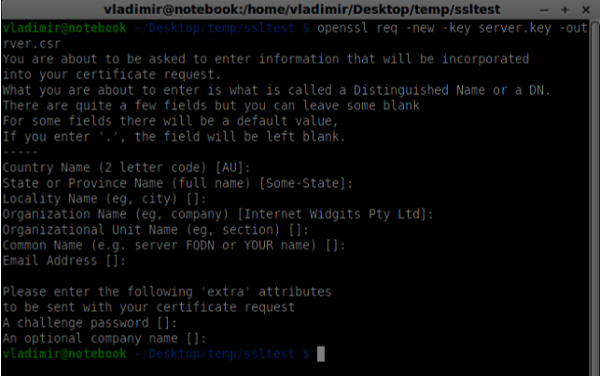
生成签名请求。系统将询问您有关公司的其他问题。一直按下“ Enter”按钮。
openssl req -new -key server.key -out server.csr
-
生成证书
openssl x509 -req -days 1095 -in server.csr -signkey server.key -out server.crt
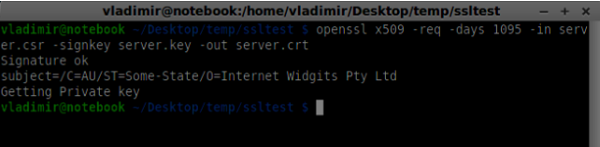
现在,您有两个文件,证书(server.crt)和私钥(server.key)。将它们复制到信令服务器的根文件夹中。
要启用安全套接字连接,请修改我们的信令服务器。
//require file system module
var fs = require('fs');
var httpServ = require('https');

//https://github.com/visionmedia/superagent/issues/205
process.env.NODE_TLS_REJECT_UNAUTHORIZED = "0";

//out secure server will bind to the port 9090
var cfg = {
   port: 9090,
   ssl_key: 'server.key',
   ssl_cert: 'server.crt'
};

//in case of http request just send back "OK"
var processRequest = function(req, res) {
   res.writeHead(200);
   res.end("OK");
};

//create our server with SSL enabled
var app = httpServ.createServer({
   key: fs.readFileSync(cfg.ssl_key),
   cert: fs.readFileSync(cfg.ssl_cert)
}, processRequest).listen(cfg.port);

//require our websocket library
var WebSocketServer = require('ws').Server;

//creating a websocket server at port 9090
var wss = new WebSocketServer({server: app});

//all connected to the server users
var users = {};

//require the redis library in Node.js
var redis = require("redis");

//creating the redis client object
var redisClient = redis.createClient();

//when a user connects to our sever
wss.on('connection', function(connection){
//...other code
在上面的代码中,我们要求fs库读取私钥和证书,创建具有绑定端口和私钥和证书路径的cfg对象。然后,我们使用密钥以及端口9090上的WebSocket服务器创建一个HTTPS服务器。
现在在Opera中打开https:// localhost:9090 。您应该看到以下内容-
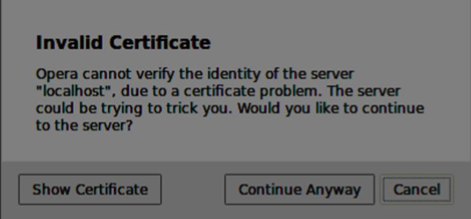
单击“仍然继续”按钮。您应该看到“确定”消息。
为了测试我们的安全信令服务器,我们将修改在“ WebRTC Text Demo”教程中创建的聊天应用程序。我们只需要添加一个密码字段。以下是整个index.html文件-
WebRTC Text Demo
WebRTC Text Demo. Please sign in
Text chat
我们还需要通过以下行在client.js文件中启用安全套接字连接:var conn = new WebSocket(’wss:// localhost:9090’); 。注意wss协议。然后,必须修改登录按钮处理程序以发送密码和用户名-
loginBtn.addEventListener("click", function (event) {
   name = usernameInput.value;
   var pwd = passwordInput.value;

   if (name.length > 0) {
      send({
         type: "login",
         name: name,
         password: pwd
      });
   }

});
以下是整个client.js文件-
//our username
var name;
var connectedUser;

//connecting to our signaling server
var conn = new WebSocket('wss://localhost:9090');

conn.onopen = function () {
   console.log("Connected to the signaling server");
};

//when we got a message from a signaling server
conn.onmessage = function (msg) {
   console.log("Got message", msg.data);

   var data = JSON.parse(msg.data);

   switch(data.type) {
      case "login":
         handleLogin(data.success);
         break;
      //when somebody wants to call us
      case "offer":
         handleOffer(data.offer, data.name);
         break;
      case "answer":
         handleAnswer(data.answer);
         break;
      //when a remote peer sends an ice candidate to us
      case "candidate":
         handleCandidate(data.candidate);
         break;
      case "leave":
         handleLeave();
         break;
      default:
         break;
   }
};

conn.onerror = function (err) {
   console.log("Got error", err);
};

//alias for sending JSON encoded messages
function send(message) {
   //attach the other peer username to our messages
   if (connectedUser) {
      message.name = connectedUser;
   }

   conn.send(JSON.stringify(message));
};

//******
//UI selectors block
//******

var loginPage = document.querySelector('#loginPage');
var usernameInput = document.querySelector('#usernameInput');
var passwordInput = document.querySelector('#passwordInput');
var loginBtn = document.querySelector('#loginBtn');

var callPage = document.querySelector('#callPage');
var callToUsernameInput = document.querySelector('#callToUsernameInput');
var callBtn = document.querySelector('#callBtn');
var hangUpBtn = document.querySelector('#hangUpBtn');

var msgInput = document.querySelector('#msgInput');
var sendMsgBtn = document.querySelector('#sendMsgBtn');
var chatArea = document.querySelector('#chatarea');

var yourConn;
var dataChannel;

callPage.style.display = "none";

// Login when the user clicks the button
loginBtn.addEventListener("click", function (event) {
   name = usernameInput.value;
   var pwd = passwordInput.value;

   if (name.length > 0) {
      send({
         type: "login",
         name: name,
         password: pwd
      });
   }

});

function handleLogin(success) {
   if (success === false) {
      alert("Ooops...incorrect username or password");
   } else {
      loginPage.style.display = "none";
      callPage.style.display = "block";

      //**********************
      //Starting a peer connection
      //**********************

      //using Google public stun server
      var configuration = {
         "iceServers": [{ "url": "stun:stun2.1.google.com:19302" }]
      };

      yourConn = new webkitRTCPeerConnection(configuration, {optional: [{RtpDataChannels: true}]});

      // Setup ice handling
      yourConn.onicecandidate = function (event) {
         if (event.candidate) {
            send({
               type: "candidate",
               candidate: event.candidate
            });
         }
      };

      //creating data channel
      dataChannel = yourConn.createDataChannel("channel1", {reliable:true});

      dataChannel.onerror = function (error) {
         console.log("Ooops...error:", error);
      };

      //when we receive a message from the other peer, display it on the screen
      dataChannel.onmessage = function (event) {
         chatArea.innerHTML += connectedUser + ": " + event.data + "
";
      };

      dataChannel.onclose = function () {
         console.log("data channel is closed");
      };
   }

};

//initiating a call
callBtn.addEventListener("click", function () {
   var callToUsername = callToUsernameInput.value;

   if (callToUsername.length > 0) {

      connectedUser = callToUsername;

      // create an offer
      yourConn.createOffer(function (offer) {
         send({
            type: "offer",
            offer: offer
         });

         yourConn.setLocalDescription(offer);

      }, function (error) {
         alert("Error when creating an offer");
      });
   }
});

//when somebody sends us an offer
function handleOffer(offer, name) {
   connectedUser = name;
   yourConn.setRemoteDescription(new RTCSessionDescription(offer));

   //create an answer to an offer
   yourConn.createAnswer(function (answer) {
      yourConn.setLocalDescription(answer);

      send({
         type: "answer",
         answer: answer
      });

   }, function (error) {
      alert("Error when creating an answer");
   });

};

//when we got an answer from a remote user
function handleAnswer(answer) {
   yourConn.setRemoteDescription(new RTCSessionDescription(answer));
};

//when we got an ice candidate from a remote user
function handleCandidate(candidate) {
   yourConn.addIceCandidate(new RTCIceCandidate(candidate));
};

//hang up
hangUpBtn.addEventListener("click", function () {

   send({
      type: "leave"
   });

   handleLeave();
});

function handleLeave() {
   connectedUser = null;
   yourConn.close();
   yourConn.onicecandidate = null;
};

//when user clicks the "send message" button
sendMsgBtn.addEventListener("click", function (event) {
   var val = msgInput.value;
   chatArea.innerHTML += name + ": " + val + "
";

   //sending a message to a connected peer
   dataChannel.send(val);
   msgInput.value = "";
});
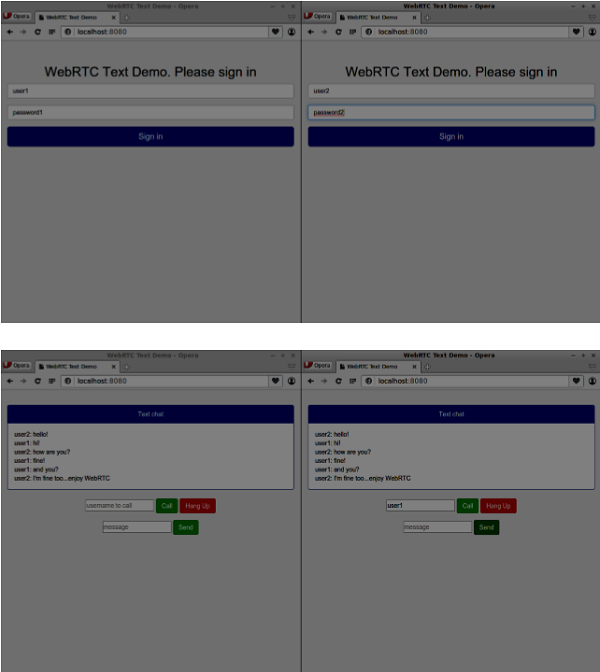
现在通过节点服务器运行我们的安全信令服务器。在修改后的聊天演示文件夹中运行节点静态。在两个浏览器选项卡中打开localhost:8080 。尝试登录。请记住,只有带有“ password1”的“ user1”和带有“ password2”的“ user2”才允许登录。然后建立RTCPeerConnection(呼叫另一个用户)并尝试发送消息。
以下是我们的安全信令服务器的完整代码-
//require file system module
var fs = require('fs');
var httpServ = require('https');

//https://github.com/visionmedia/superagent/issues/205
process.env.NODE_TLS_REJECT_UNAUTHORIZED = "0";

//out secure server will bind to the port 9090
var cfg = {
   port: 9090,
   ssl_key: 'server.key',
   ssl_cert: 'server.crt'
};

//in case of http request just send back "OK"
var processRequest = function(req, res){
   res.writeHead(200);
   res.end("OK");
};

//create our server with SSL enabled
var app = httpServ.createServer({
   key: fs.readFileSync(cfg.ssl_key),
   cert: fs.readFileSync(cfg.ssl_cert)
}, processRequest).listen(cfg.port);

//require our websocket library
var WebSocketServer = require('ws').Server;

//creating a websocket server at port 9090
var wss = new WebSocketServer({server: app});

//all connected to the server users
var users = {};

//require the redis library in Node.js
var redis = require("redis");

//creating the redis client object
var redisClient = redis.createClient();

//when a user connects to our sever
wss.on('connection', function(connection) {
   console.log("user connected");

   //when server gets a message from a connected user
   connection.on('message', function(message) {

      var data;
      //accepting only JSON messages
      try {
         data = JSON.parse(message);
      } catch (e) {
         console.log("Invalid JSON");
         data = {};
      }

      //check whether a user is authenticated
      if(data.type != "login") {
         //if user is not authenticated
         if(!connection.isAuth) {
            sendTo(connection, {
               type: "error",
               message: "You are not authenticated"
            });

            return;
         }
      }

      //switching type of the user message
      switch (data.type) {
         //when a user tries to login
         case "login":
            console.log("User logged:", data.name);
            //get password for this username from redis database
            redisClient.get(data.name, function(err, reply) {

               //check if password matches with the one stored in redis
               var loginSuccess = reply === data.password;

               //if anyone is logged in with this username or incorrect password
                  then refuse
               if(users[data.name] || !loginSuccess) {
                  sendTo(connection, {
                     type: "login",
                     success: false
                  });
               } else {
                  //save user connection on the server
                  users[data.name] = connection;
                  connection.name = data.name;
                  connection.isAuth = true;

                  sendTo(connection, {
                     type: "login",
                     success: true
                  });
               }
            });

            break;

         case "offer":
            //for ex. UserA wants to call UserB
            console.log("Sending offer to: ", data.name);

            //if UserB exists then send him offer details
            var conn = users[data.name];

            if(conn != null) {
               //setting that UserA connected with UserB
               connection.otherName = data.name;

               sendTo(conn, {
                  type: "offer",
                  offer: data.offer,
                  name: connection.name
               });
            }

            break;

         case "answer":
            console.log("Sending answer to: ", data.name);
            //for ex. UserB answers UserA
            var conn = users[data.name];

            if(conn != null) {
               connection.otherName = data.name;

               sendTo(conn, {
                  type: "answer",
                  answer: data.answer
               });
            }

            break;

         case "candidate":
            console.log("Sending candidate to:",data.name);
            var conn = users[data.name];

            if(conn != null) {
               sendTo(conn, {
                  type: "candidate",
                  candidate: data.candidate
               });
            }

            break;

         case "leave":
            console.log("Disconnecting from", data.name);
            var conn = users[data.name];
            conn.otherName = null;

            //notify the other user so he can disconnect his peer connection
            if(conn != null) {
               sendTo(conn, {
                  type: "leave"
               });
            }

            break;

         connection.on("close", function() {

            if(connection.name) {
               delete users[connection.name];

               if(connection.otherName) {
                  console.log("Disconnecting from ", connection.otherName);
                  var conn = users[connection.otherName];
                  conn.otherName = null;

                  if(conn != null) {
                     sendTo(conn, {
                        type: "leave"
                    });
                  }

               }
            }
         });

         default:
            sendTo(connection, {
               type: "error",
               message: "Command no found: " + data.type
            });

            break;
      }
   });

   //when user exits, for example closes a browser window
   //this may help if we are still in "offer","answer" or "candidate" state
   connection.on("close", function() {
      if(connection.name) {
         delete users[connection.name];
      }
   });

   connection.send("Hello from server");
});

function sendTo(connection, message) {
   connection.send(JSON.stringify(message));
}
概要
在本章中,我们向信令服务器添加了用户身份验证。我们还学习了如何创建自签名SSL证书,以及如何在WebRTC应用程序范围内使用它们。