📌 相关文章
- javafx UI单选按钮(1)
- javafx UI单选按钮
- javafx 按钮 css (1)
- javafx 按钮 css 代码示例
- javafx UI标签
- javafx UI标签(1)
- JavaFX |带有示例的按钮(1)
- JavaFX |带有示例的按钮
- Javafx 按钮颜色 - Java (1)
- JavaFX |切换按钮类
- JavaFX |切换按钮类(1)
- javafx 初始化按钮 (1)
- JavaFX |菜单按钮
- JavaFX |菜单按钮(1)
- Javafx 按钮颜色 - Java 代码示例
- JavaFX |弧与示例(1)
- JavaFX |弧与示例
- JavaFX-UI控件(1)
- JavaFX-UI控件
- JavaFX UI控件
- JavaFX UI控件(1)
- javafx 按钮填充 css (1)
- javafx 初始化按钮 - 任何代码示例
- jQuery UI |按钮(1)
- jQuery UI |按钮(1)
- jQuery UI |按钮
- jQuery UI |按钮
- javafx 按钮填充 css 代码示例
- 示例 javafx - Java (1)
📜 javafx UI按钮
📅 最后修改于: 2020-10-14 06:01:42 🧑 作者: Mango
JavaFX按钮
JavaFX按钮控件由javafx.scene.control.Button类表示。按钮是可以控制应用程序行为的组件。只要单击按钮,就会生成一个事件。
如何创建一个按钮?
可以通过实例化Button类来创建Button。使用以下行创建按钮对象。
Button btn = new Button("My Button");
向场景图添加按钮
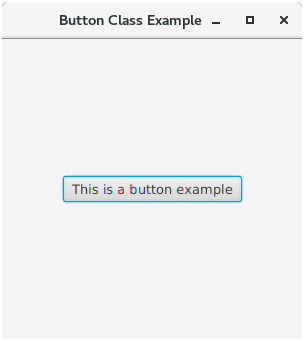
为了使屏幕上的按钮可视化,我们必须将其附加到场景对象上。以下代码创建一个按钮并将其添加到场景对象。
package application;
import javafx.application.Application;
import javafx.scene.Scene;
import javafx.scene.control.Button;
import javafx.scene.layout.StackPane;
import javafx.stage.Stage;

public class ButtonTest extends Application {

@Override
public void start(Stage primaryStage) throws Exception {
// TODO Auto-generated method stub

StackPane root = new StackPane();
Button btn=new Button("This is a button");
Scene scene=new Scene(root,300,300);
root.getChildren().add(btn);
primaryStage.setScene(scene);
primaryStage.setTitle("Button Class Example");
primaryStage.show();

}
public static void main(String[] args) {
launch(args);
}
}
输出:
设置按钮的文字
有两种方法可以在按钮上设置文本。
- 将文本传递给类构造函数
- 通过调用setText(“ text”)方法
包装按钮文字
如果要显示的文本太长,我们可以将按钮的文本包装成多行。这可以通过在Button类的实例上调用setter方法setWrapText(boolean)来完成。在需要的地方,在方法中传递布尔值true。
Btn.setWrapText(true);
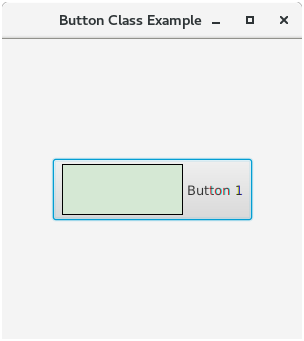
在按钮上设置图像
Button类包含一个构造函数,该构造函数可以接受图形以及按钮上显示的文本。以下代码在按钮上实现图像。
package application;

import java.io.FileInputStream;

import javafx.application.Application;
import javafx.scene.Scene;
import javafx.scene.control.Button;
import javafx.scene.image.Image;
import javafx.scene.image.ImageView;
import javafx.scene.layout.StackPane;
import javafx.stage.Stage;

public class ButtonTest extends Application {

@Override
public void start(Stage primaryStage) throws Exception {
// TODO Auto-generated method stub


FileInputStream input=new FileInputStream("/home/javatpoint/Desktop/JavaFX/Images/colored_label.png");
Image image = new Image(input);
ImageView img=new ImageView(image);

StackPane root = new StackPane();
Button btn=new Button("Button 1",img);
btn.setWrapText(true);
Scene scene=new Scene(root,300,300);
root.getChildren().add(btn);
primaryStage.setScene(scene);
primaryStage.setTitle("Button Class Example");
primaryStage.show();

}
public static void main(String[] args) {
launch(args);
}
}
输出:
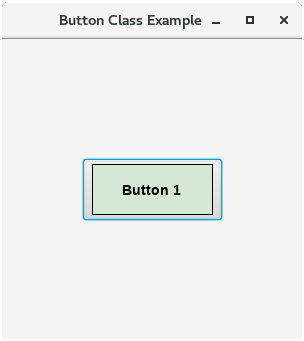
使用setGraphic()方法:
Button类还提供了一个名为setGraphic()的实例方法。我们必须通过此方法传递图像视图对象。以下代码实现setGraphic()方法。
package application;

import java.io.FileInputStream;

import javafx.application.Application;
import javafx.scene.Scene;
import javafx.scene.control.Button;
import javafx.scene.image.Image;
import javafx.scene.image.ImageView;
import javafx.scene.layout.StackPane;
import javafx.stage.Stage;

public class ButtonTest extends Application {

@Override
public void start(Stage primaryStage) throws Exception {
// TODO Auto-generated method stub


FileInputStream input=new FileInputStream("/home/javatpoint/Desktop/JavaFX/Images/colored_label.png");
Image image = new Image(input);
ImageView img=new ImageView(image);

StackPane root = new StackPane();
Button btn=new Button();
btn.setGraphic(img);
btn.setWrapText(true);
Scene scene=new Scene(root,300,300);
root.getChildren().add(btn);
primaryStage.setScene(scene);
primaryStage.setTitle("Button Class Example");
primaryStage.show();

}
public static void main(String[] args) {
launch(args);
}
}
输出:
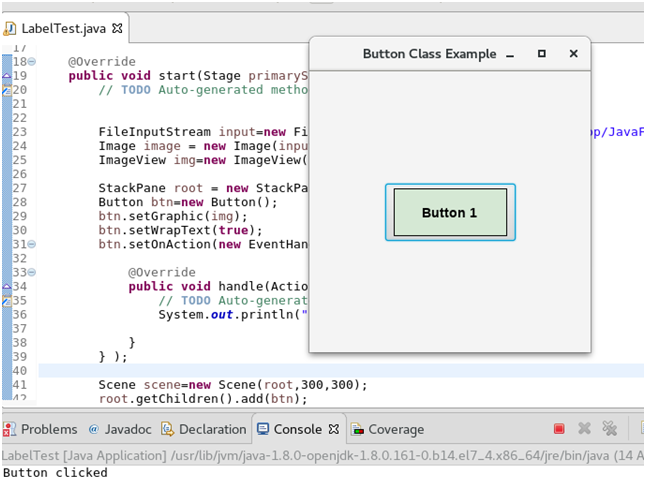
按钮动作
Button类提供了setOnAction()方法,该方法用于设置按钮click事件的操作。实现handle()方法的匿名类的对象在此方法中作为参数传递。
我们还可以传递lambda表达式来处理事件。以下代码实现Button事件。
package application;

import java.io.FileInputStream;

import javafx.application.Application;
import javafx.event.ActionEvent;
import javafx.event.EventHandler;
import javafx.scene.Scene;
import javafx.scene.control.Button;
import javafx.scene.image.Image;
import javafx.scene.image.ImageView;
import javafx.scene.layout.StackPane;
import javafx.stage.Stage;

public class LabelTest extends Application {

@Override
public void start(Stage primaryStage) throws Exception {
// TODO Auto-generated method stub


FileInputStream input=new FileInputStream("/home/javatpoint/Desktop/JavaFX/Images/colored_label.png");
Image image = new Image(input);
ImageView img=new ImageView(image);

StackPane root = new StackPane();
Button btn=new Button();
btn.setGraphic(img);
btn.setWrapText(true);
btn.setOnAction(new EventHandler() {

@Override
publicvoid handle(ActionEvent arg0) {
// TODO Auto-generated method stub
System.out.println("Button clicked");

}
} );

Scene scene=new Scene(root,300,300);
root.getChildren().add(btn);
primaryStage.setScene(scene);
primaryStage.setTitle("Button Class Example");
primaryStage.show();

}
public static void main(String[] args) {
launch(args);
}
}
输出:
按钮效果
我们可以将效果应用到Button。这些效果由javafx.scene.effect包提供。以下代码显示了如何将阴影效果应用于按钮。
package application;

import java.io.FileInputStream;

import javafx.application.Application;
import javafx.event.ActionEvent;
import javafx.event.EventHandler;
import javafx.scene.Scene;
import javafx.scene.control.Button;
import javafx.scene.effect.DropShadow;
import javafx.scene.image.Image;
import javafx.scene.image.ImageView;
import javafx.scene.layout.StackPane;
import javafx.stage.Stage;

public class ButtonTest extends Application {

@Override
public void start(Stage primaryStage) throws Exception {
// TODO Auto-generated method stub


FileInputStream input=new FileInputStream("/home/javatpoint/Desktop/JavaFX/Images/colored_label.png");
Image image = new Image(input);
ImageView img=new ImageView(image);
DropShadow shadow = new DropShadow();

StackPane root = new StackPane();
Button btn=new Button();
btn.setEffect(shadow);
btn.setGraphic(img);
btn.setWrapText(true);
btn.setOnAction(new EventHandler() {

@Override
public void handle(ActionEvent arg0) {
// TODO Auto-generated method stub
System.out.println("Button clicked");

}
} );
Scene scene=new Scene(root,300,300);
root.getChildren().add(btn);
primaryStage.setScene(scene);
primaryStage.setTitle("Button Class Example");
primaryStage.show();

}
public static void main(String[] args) {
launch(args);
}
}
输出:
