ElectronJS是一个开源框架,用于使用能够在Windows,macOS和Linux操作系统上运行的Web技术(例如HTML,CSS和JavaScript)构建跨平台的本机桌面应用程序。它将Chromium引擎和NodeJS组合到单个运行时中。
Electron可以与几个强大的框架(例如Angular 4+ , AngularJS 1.x , React)结合使用,以构建复杂的应用程序并提供增强的功能。 Electron的核心是可以与本机OS环境交互的NodeJS应用程序。通过NodeJS集成,我们可以访问几个低级API,否则在沙盒浏览器环境中将无法访问这些API。通过Angular集成,我们可以获得多种优势和功能,例如MVC(模型-视图-控制器)架构,模块和自定义指令。本教程将演示如何将Angular 7与ElectronJS集成以及如何从Angular中访问Electron API。
我们假定您熟悉上述链接中介绍的先决条件。为了使Electron和Angular正常工作,需要在系统中预安装node和npm 。
注意:本教程也适用于Angular 5+版本。
示例:按照给定的步骤将Angular 7与Electron集成。
- 第1步:导航到“空目录”以设置项目,然后运行以下命令,
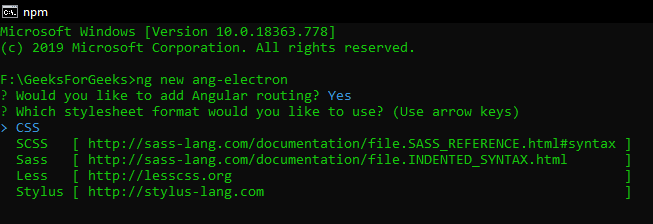
npm install -g @angular/cli全局安装Angular CLI 。 Angular CLI工具用于创建项目,执行诸如测试和部署之类的任务以及生成代码的各种组件。通过运行以下命令创建一个新的Angular项目,并提供您选择的项目名称,
ng new ang-electron该命令提示您提供有关要包含在项目中的功能的信息。通过按Enter键选择适当的内容。
这还将把所需的Angular依赖关系和软件包安装到node_modules中。完成后,使用npm安装Electron并将其另存为dev-dependency。
npm install electron --save-dev至此,Angular应用程序已准备就绪,可以在本地提供服务。要在localhost上提供应用程序,请运行以下命令,
cd ang-electron
ng serve
- 步骤2:我们将通过代码连接两个框架,以启动Electron应用程序并使其使用Angular。与任何Electron项目一样,我们需要在应用程序中创建一个入口点。在我们的基础项目文件夹中创建main.js文件。该文件将成为我们进入应用程序的入口。
main.js:
const { app, BrowserWindow } = require('electron') function createWindow () { // Create the browser window. const win = new BrowserWindow({ width: 800, height: 600, webPreferences: { nodeIntegration: true } }) // Load the index.html of the app // From the dist folder which is created // After running the build command win.loadFile('dist/ang-electron/index.html') // Open the DevTools. win.webContents.openDevTools() } // This method will be called when Electron has finished // initialization and is ready to create browser windows. // Some APIs can only be used after this event occurs. // This method is equivalent to 'app.on('ready', function())' app.whenReady().then(createWindow) // Quit when all windows are closed. app.on('window-all-closed', () => { // On macOS it is common for applications and their // menu bar to stay active until the user quits // explicitly with Cmd + Q if (process.platform !== 'darwin') { app.quit() } }) app.on('activate', () => { // On macOS it's common to re-create a window in the // app when the dock icon is clicked and there are // no other windows open. if (BrowserWindow.getAllWindows().length === 0) { createWindow() } }) // In this file, you can include the rest of your app's // specific main process code. You can also put them in // separate files and require them here.有关main.js文件的样板代码,请参阅此链接。我们已经修改了代码以适合我们的项目需求。一旦运行了build命令,它将在dist文件夹中创建角度项目的分布。我们将引用此文件夹中的index.html文件。
- 步骤3:需要对src文件夹中的index.html文件进行一些小的更改。替换以下代码。
和
<'base href="./">此更改很重要,否则它将无法从dist文件夹中找到和引用运行该应用程序所需的必要文件。我们还需要对package.json文件进行一些更改。
package.json:
{ "name": "ang-electron", "version": "0.0.0", "main": "main.js", "scripts": { "ng": "ng", "start": "ng serve", "build": "ng build", "test": "ng test", "lint": "ng lint", "e2e": "ng e2e", "electron": "ng build && electron ." }, // ...我们已经按照Electron的要求指定了main.js文件。我们还在scripts标记中引入了一个新的自定义电子命令,用于构建和启动该应用程序。 ng build命令用于构建Angular应用程序和部署构建工件。它将生成的构建工件写入输出文件夹。默认情况下,输出文件夹为dist / 。
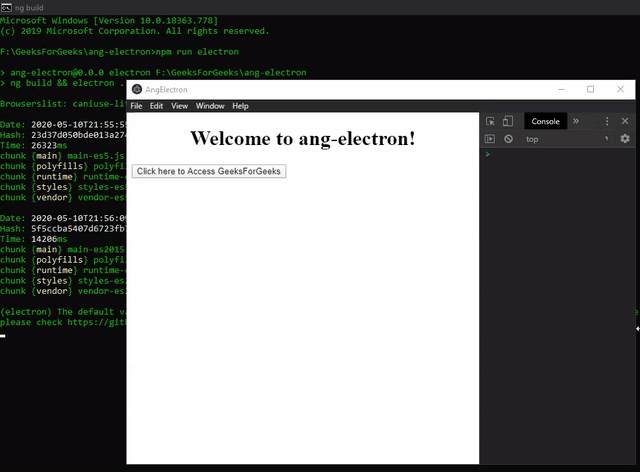
输出:完成相应的更改后,我们准备启动Electron应用程序。要启动该应用程序,请运行以下命令,
npm run electron
- 步骤4:至此,我们已成功将Angular与Electron集成在一起。要在Angular中使用Electron API,我们可以采用以下两种方法之一:
- 方法1:使用外部程序包访问Electron API。为此,我们将使用ngx-electron npm软件包。我们可以将此程序包用作简单的Angular服务来访问Electron API。有关更多详细信息,请参阅此链接。要安装此软件包,请运行以下命令:
npm install ngx-electron --save成功安装后,我们会将其导入到app.module.ts文件中,以便在整个应用程序中使用。
app.module.ts:
import { BrowserModule } from '@angular/platform-browser';
import { NgModule } from '@angular/core';
import { AppRoutingModule } from './app-routing.module';
import { AppComponent } from './app.component';
import { NgxElectronModule } from 'ngx-electron';

@NgModule({
  declarations: [
    AppComponent
  ],
  imports: [
    BrowserModule,
    AppRoutingModule,
    NgxElectronModule
  ],
  providers: [],
  bootstrap: [AppComponent]
})
export class AppModule { }
有关此程序包支持的Electron API的列表,请参阅此https://www.npmjs.com/package/ngx-electron#properties 。我们将使用ngx-electron软件包中的Electron shell API。
app.component.html:
Welcome to {{ title }}!
单击此处以访问GeeksForGeeks按钮没有任何关联的功能。要更改此设置,请对app.component.ts文件进行以下更改。
app.component.ts:
import { Component } from '@angular/core'; import { ElectronService } from 'ngx-electron'; @Component({ selector: 'app-root', templateUrl: './app.component.html', styleUrls: ['./app.component.css'] }) export class AppComponent { title = 'ang-electron'; constructor(private electronService: ElectronService) {} openWindow() { // Accessing the Shell API from ngx-electron this.electronService .shell.openExternal('https://www.geeksforgeeks.org/'); } }ElectronService公开了可从Renderer进程中访问的所有Electron API。我们将通过依赖注入在构造函数中创建ElectronService的实例。输出:
- 方法2:通过创建Electron Service组件并在整个应用程序中共享它以使用Electron API。我们将通过运行以下CLI命令来生成Electron服务:
ng generate service elec --skipTests=true–skipTests = true不会为新服务创建spec.ts测试文件。此命令将在src / app文件夹中生成一个新的elec.service.ts文件。在此文件中,我们将声明并添加所有可以在整个应用程序中使用的电子导入。我们将使用Main Process中的Electron shell API。
elec.service.ts:
import { Injectable } from '@angular/core'; import { shell } from 'electron'; @Injectable({ providedIn: 'root' }) export class ElecService { shell: typeof shell; constructor() { this.shell = (window).require("electron").shell; } } any关键字用于窗口对象上的Type Assertion 。使用
any转换此Object表示您不再被编译器绑定到window对象的默认属性。这用于防止在使用Electron模块时发生编译时类型错误。如果在Windows对象上忽略类型转换,我们将收到以下错误:ERROR in ./node_modules/electron/index.js Module not found: Error: Can't resolve 'fs'typeof运算符以字符串形式返回其操作数的数据类型。在这种情况下,操作数是Electron的外壳模块。使用这种方法使我们可以访问整个应用程序中的所有Electron API。要使用此服务,请将以下内容添加到app.component.ts文件中。
app.component.ts:
import { Component } from '@angular/core';
import { ElectronService } from 'ngx-electron';
import { ElecService } from '../app/elec.service';

@Component({
  selector: 'app-root',
  templateUrl: './app.component.html',
  styleUrls: ['./app.component.css']
})
export class AppComponent {
  title = 'ang-electron';

  // Creating Instances through Dependency Injection
  constructor(private electronService: ElectronService,
              private elecService: ElecService) {}

  openWindow() {
    // Accessing the Shell API from ngx-electron
    // this.electronService
    // .shell.openExternal('https://www.geeksforgeeks.org/');

    // Accessing the Shell API from ElecService
    this.elecService.shell
             .openExternal('https://www.geeksforgeeks.org/');
  }
}
输出:

- 方法1:使用外部程序包访问Electron API。为此,我们将使用ngx-electron npm软件包。我们可以将此程序包用作简单的Angular服务来访问Electron API。有关更多详细信息,请参阅此链接。要安装此软件包,请运行以下命令: