Ant Design是企业级产品的设计模式,可以与Angular,React或Vue等其他前端框架集成。 Ant Design官方实现随React一起发布,但可以与其他JavaScript框架一起使用。它是一个开源工具,拥有约50.4K GitHub星,它是世界上第二使用最多的React UI库。许多公司正在使用这种设计模式,例如阿里巴巴,腾讯,滴滴等。
蚂蚁设计的特点:
- 支持国际化。
- 丰富的交互式用户界面。
- 强大的主题自定义。
- 存在高质量的组件。
- 高性能。
先决条件:
- 诸如VSCode,Sublime,Brackets等的代码编辑器。
- NodeJS应该安装在系统中
For Windows
https://www.geeksforgeeks.org/installation-of-node-js-on-windows/
For Linux
https://www.geeksforgeeks.org/installation-of-node-js-on-linux/
- 设置Angular项目的知识
https://www.geeksforgeeks.org/angular-7-installation/
安装Ant的Angular设计
- 在终端中,转到您创建的angular项目的文件夹,然后使用以下命令安装Angular的Ant Design:
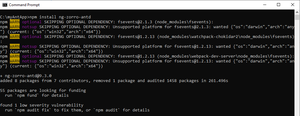
npm install ng-zorro-antd
- 在“ angular.json”文件中,以样式数组添加Ant Design .css文件,如下所示:
{ "$schema": "./node_modules/@angular/cli/lib/config/schema.json", "version": 1, "newProjectRoot": "projects", "projects": { "myAntApp": { "projectType": "application", "schematics": { "@schematics/angular:component": { "style": "scss" } }, "root": "", "sourceRoot": "src", "prefix": "app", "architect": { "build": { "builder": "@angular-devkit/build-angular:browser", "options": { "outputPath": "dist/myAntApp", "index": "src/index.html", "main": "src/main.ts", "polyfills": "src/polyfills.ts", "tsConfig": "tsconfig.app.json", "aot": true, "assets": [ "src/favicon.ico", "src/assets" ], "styles": [ "node_modules/ng-zorro-antd/src/ng-zorro-antd.min.css", "src/styles.scss" ], "scripts": [] }, "configurations": { "production": { "fileReplacements": [ { "replace": "src/environments/environment.ts", "with": "src/environments/environment.prod.ts" } ], "optimization": true, "outputHashing": "all", "sourceMap": false, "extractCss": true, "namedChunks": false, "extractLicenses": true, "vendorChunk": false, "buildOptimizer": true, "budgets": [ { "type": "initial", "maximumWarning": "2mb", "maximumError": "5mb" }, { "type": "anyComponentStyle", "maximumWarning": "6kb", "maximumError": "10kb" } ] } } }, "serve": { "builder": "@angular-devkit/build-angular:dev-server", "options": { "browserTarget": "myAntApp:build" }, "configurations": { "production": { "browserTarget": "myAntApp:build:production" } } }, "extract-i18n": { "builder": "@angular-devkit/build-angular:extract-i18n", "options": { "browserTarget": "myAntApp:build" } }, "test": { "builder": "@angular-devkit/build-angular:karma", "options": { "main": "src/test.ts", "polyfills": "src/polyfills.ts", "tsConfig": "tsconfig.spec.json", "karmaConfig": "karma.conf.js", "assets": [ "src/favicon.ico", "src/assets" ], "styles": [ "src/styles.scss" ], "scripts": [] } }, "lint": { "builder": "@angular-devkit/build-angular:tslint", "options": { "tsConfig": [ "tsconfig.app.json", "tsconfig.spec.json", "e2e/tsconfig.json" ], "exclude": [ "**/node_modules/**" ] } }, "e2e": { "builder": "@angular-devkit/build-angular:protractor", "options": { "protractorConfig": "e2e/protractor.conf.js", "devServerTarget": "myAntApp:serve" }, "configurations": { "production": { "devServerTarget": "myAntApp:serve:production" } } } } }}, "defaultProject": "myAntApp" } - 在“ app.module.ts”中导入Ant Design按钮模块,以便我们可以在.html文件中对其进行访问,如下所示:
import { BrowserModule } from '@angular/platform-browser'; import { NgModule } from '@angular/core'; import { AppRoutingModule } from './app-routing.module'; import { AppComponent } from './app.component'; import { NzButtonModule } from 'ng-zorro-antd/button'; @NgModule({ declarations: [ AppComponent ], imports: [ BrowserModule, AppRoutingModule, NzButtonModule ], providers: [], bootstrap: [AppComponent] }) export class AppModule { } - 在“ app.component.html”文件中,添加以下代码,如下所示:
- 在“ app.component.scss”中添加一些CSS,以在中心显示按钮,如下所示:
[nz-button] { margin-left: 50%; margin-top: 3%; }- 在终端中,使用以下命令在浏览器中运行应用程序:
ng serve -o
输出:
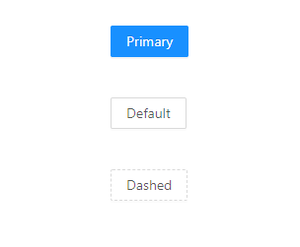
浏览器中的最终输出
- 在终端中,使用以下命令在浏览器中运行应用程序: