使用 Pygame 制作应用程序
在本文中,我们将了解如何使用 Pygame 制作一个简单的应用程序。
Pygame 是一个Python库,可以帮助我们构建多媒体应用程序(Apps)和游戏。该库用作简单 DirectMedia 层 (SDL) 的包装器。
方法
- 创建应用类
- 添加文本类。
- 添加屏幕类
- 设置不同的窗口。
什么是类?
类是用于创建对象的类似模板的实体。这些类对象由与其相关的各种行为组成。在 Pygame 中,我们有不同类型的类可用,它们是App 类、文本类、场景类。这些通常有自己的行为和属性,可以用于不同的目的。
应用类
App 类是游戏模板或我们正在构建的任何应用程序的基础。这个类也可以称为应用程序或游戏的基础或形成。它允许在 Pygame 中实现各种功能,如可调整大小、全屏和无帧模式,因此在Python中通过 Pygame 声明或构建任何应用程序或游戏时,它成为必要的类。
形成基本 App 类所需的步骤:
- 导入 Pygame 模块。
- 现在,我们初始化 App 类。
- 声明主类并运行应用程序类。
Python3
# importing pygame and we can call it by using py
import pygame as py
# importing all the libraries of pygame.local
from pygame.locals import *
# this is a simple App class in pygame
class App_Class:
def __init__(self):
# initializing the function for app
# class to declare the changeable content
py.init()
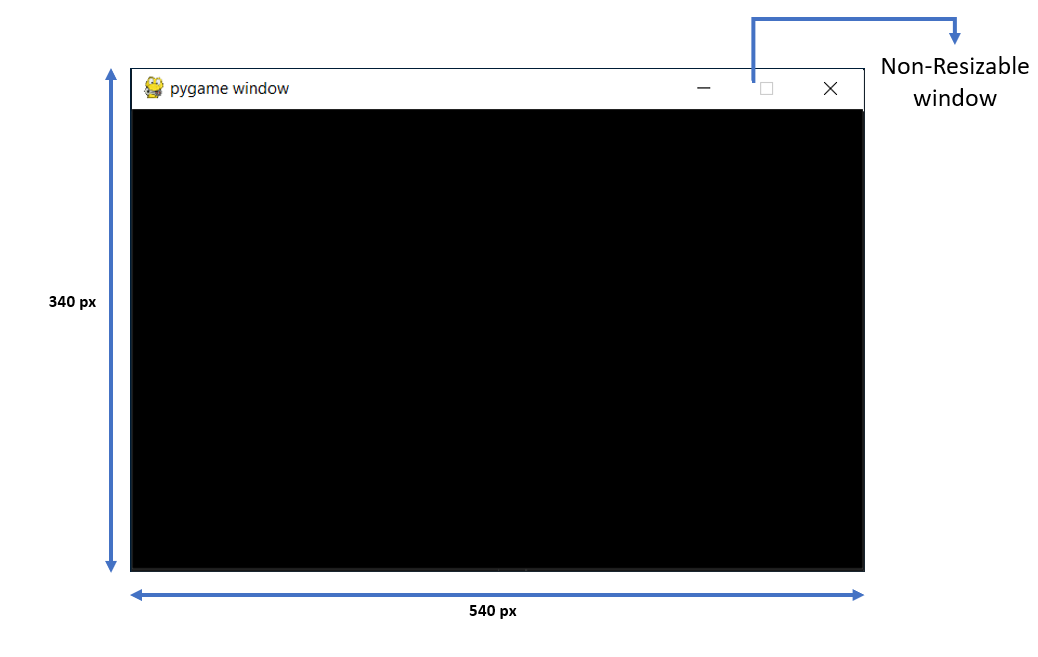
App_Class.screen = py.display.set_mode(
# size of window will be 540x340
(540, 340))
App_Class.running = True
def play(self):
# this will run until the window is visible
while App_Class.running:
for event in py.event.get():
# check whether the cancel
# button is pressed or not
if event.type == QUIT:
App_Class.running = False
py.quit()
if __name__ == '__main__':
App_Class().play()Python3
import pygame as py
from pygame.locals import *

class Text:

    def __init__(self, text, pos, **options):
        self.text = text
        self.fontname = None
        self.pos = pos
        self.fontcolor = Color('Green')

        # here 50 is the font size
        self.font = py.font.Font(self.fontname, 50)

        # rendering the text in the window
        self.placing = self.font.render(self.text, True,
                                        self.fontcolor)

        self.rect = self.placing.get_rect()

        # this fix the position of the text
        self.rect.bottomleft = self.pos

    def building(self):

        # put the text on the window
        app.screen.blit(self.placing, self.rect)


class app:

    def __init__(self):

        # Initialize all the parameters to build
        # its base a blank window will appear
        py.init()
        app.screen = py.display.set_mode((540, 340))
        app.t = Text('Text Class in pygame', pos=(100, 150))
        app.running = True

    def run(self):

        # run function
        while app.running:
            for event in py.event.get():
                if event.type == QUIT:
                    app.running = False

            app.screen.fill(Color('blue'))

            app.t.building()

            py.display.update()

        py.quit()

# program runs form here
if __name__ == '__main__':

    # calling function from the base class (app)
    app().run()
Python3
import pygame as py

title_py = "Scene 1 Starting scene"
frame = 50

# color setting for background and foreground
green = (0, 200, 0)
white = (255, 255, 255)

# this will set the font of the screen
font_size = None

# building the windows and initialising it
py.init()
clock = py.time.Clock()
screen = py.display.set_mode([740, 340])
py.display.set_caption(title_py)

# calling and building the fonts
screen_font = py.font.Font(font_size, 50)

# scene class in pygame
class Scene():
    def __init__(self):
        self.next_scene = self

    def process_input(self, events, press):
        raise NotImplementedError

    def update(self):
        raise NotImplementedError

    def rendering(self):
        raise NotImplementedError

    def terminate(self):
        self.next_scene = None

# this will be the first scene class as
# the prime and opening scene of our app
class starting_scene(Scene):
    def __init__(self):
        super().__init__()

    def process_input(self, events, press):
        for event in events:
            if event.type == py.KEYDOWN:
                if event.key == py.K_SPACE:
                    self.next_scene = EndScene()

    def rendering(self):
        screen.fill(green)
        text = screen_font.render(title_py, 1, white)
        rect = text.get_rect()
        rect.centerx = 740 // 2
        rect.centery = 50
        screen.blit(text, rect)

    def update(self):
        pass

class EndScene(Scene):
    def __init__(self):
        super().__init__()

    def process_input(self, events, press):
        for event in events:
            if event.type == py.KEYDOWN:
                if event.key == py.K_SPACE:
                    self.next_scene = starting_scene()

    def update(self):
        pass
    # rendering the scene function
    def rendering(self):
        screen.fill(green)

        # font color will be white
        text = screen_font.render("Scene 2 Game Ending ", 1, white)
        rect = text.get_rect()
        rect.centerx = 370  # location from x-axis
        rect.centery = 50  # location from y-axis
        screen.blit(text, rect)

class app_class():
    def __init__(self):
        self.running_scene = starting_scene()

    def control(self, event, press):
        x_out = event.type == py.QUIT
        quit = press[py.K_q]

        # if anyone click on the cross
        # button or press the 'q' button
        # it will quit the window
        return x_out or (quit)

    def run(self):
        while self.running_scene != None:
            eve = []
            press = py.key.get_pressed()
            for event in py.event.get():
                if self.control(event, press):
                    self.running_scene.terminate()
                else:
                    eve.append(event)

            # Manage scene
            self.running_scene.process_input(eve, press)
            self.running_scene.update()

            # dont move it as first we need to update then render
            self.running_scene.rendering()

            # moving the scene one by one
            self.running_scene = self.running_scene.next_scene

            # means it will allow user to change the scene
            py.display.flip()
            # Update and tick
            clock.tick(frame)

# main (our code will run from here)
if __name__ == "__main__":
    let_check = app_class()
    let_check.run()
    py.quit()
Python3
import pygame as py
from pygame.locals import *

# Create a displace surface object
py.init()

# Un-comment one of the following
# three line of code for varied mode of pygame
# display_surface = py.display.set_mode((500, 250), NOFRAME)
# display_surface = py.display.set_mode((500, 250), FULLSCREEN)
display_surface = py.display.set_mode((500, 250), RESIZABLE)

working = True
while working:  # run until it become false
    for event in py.event.get():
        if event.type == py.QUIT:
            working = False
    py.display.update()

py.quit()  # quit the window
输出:
pygame中的应用程序类
文本类
在构建我们的应用程序时,有时我们希望为此显示一些消息,我们需要 Text 类。它是我们可以在窗口中构建不同类型的文本格式的模板。这个类主要是实例化我们窗口的文本对象。所以我们可以说如果我们想玩我们的文本然后去 Text 类。
形成 Text 类所需的步骤:
- 从 Pygame 导入 Pygame 模块和所有库。
- 现在声明文本类及其函数,如 font_set、渲染和以前使用的应用程序类(因为应用程序类是所有其他多媒体类的基类)。
- 最后,声明用于调用应用程序类的运行函数的主类,该类将在其中运行测试类功能。
Python3
import pygame as py
from pygame.locals import *
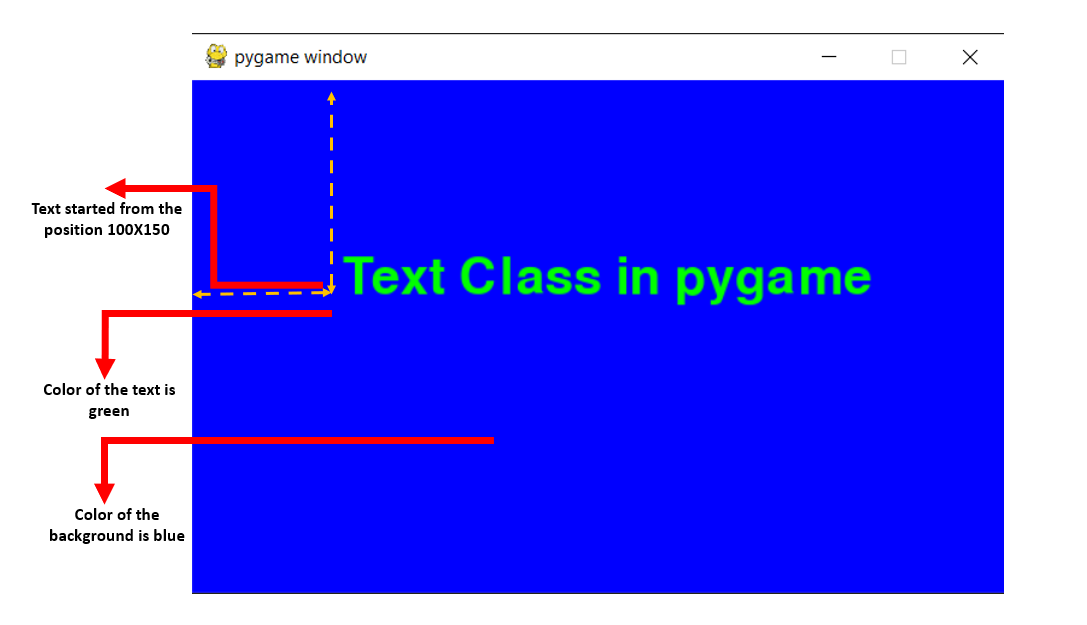
class Text:
def __init__(self, text, pos, **options):
self.text = text
self.fontname = None
self.pos = pos
self.fontcolor = Color('Green')
# here 50 is the font size
self.font = py.font.Font(self.fontname, 50)
# rendering the text in the window
self.placing = self.font.render(self.text, True,
self.fontcolor)
self.rect = self.placing.get_rect()
# this fix the position of the text
self.rect.bottomleft = self.pos
def building(self):
# put the text on the window
app.screen.blit(self.placing, self.rect)
class app:
def __init__(self):
# Initialize all the parameters to build
# its base a blank window will appear
py.init()
app.screen = py.display.set_mode((540, 340))
app.t = Text('Text Class in pygame', pos=(100, 150))
app.running = True
def run(self):
# run function
while app.running:
for event in py.event.get():
if event.type == QUIT:
app.running = False
app.screen.fill(Color('blue'))
app.t.building()
py.display.update()
py.quit()
# program runs form here
if __name__ == '__main__':
# calling function from the base class (app)
app().run()
输出:
场景类
在游戏中,我们有不同的屏幕,它们可能是介绍场景、游戏结束场景或关卡场景。在所有这些中,我们看到了不同的背景或场景。这一切都可以在 Scene 类的帮助下完成。
形成 Scene 类所需的步骤:
- 第一步是声明场景类。通过这样做,我们实际上创建了一个容器,我们可以在其中存储游戏所需的所有必要功能。
- 现在我们必须将多个场景附加到应用程序场景列表一个容器中。
- 附加后,我们将为多个场景添加场景 ID 和颜色。我们将添加一个场景ID,以便我们可以根据场景ID轻松调用每个场景。
- 现在它将翻转每个节点并最终显示屏幕。
- 场景表示之后是上面给出的唯一 ID。
Python3
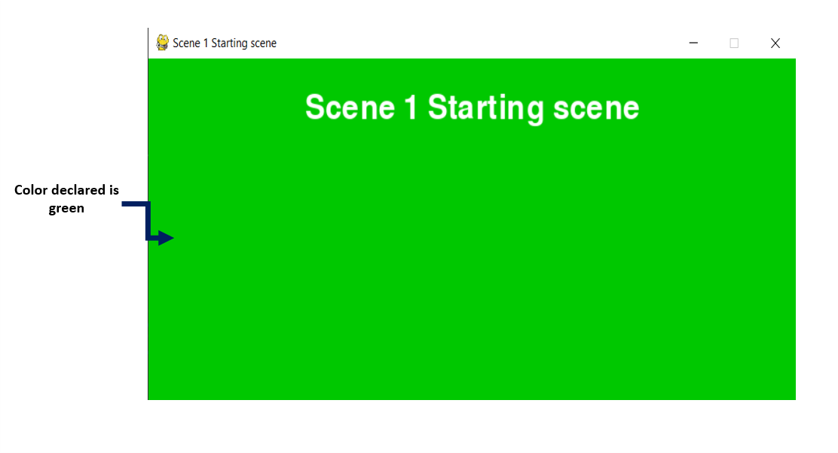
import pygame as py
title_py = "Scene 1 Starting scene"
frame = 50
# color setting for background and foreground
green = (0, 200, 0)
white = (255, 255, 255)
# this will set the font of the screen
font_size = None
# building the windows and initialising it
py.init()
clock = py.time.Clock()
screen = py.display.set_mode([740, 340])
py.display.set_caption(title_py)
# calling and building the fonts
screen_font = py.font.Font(font_size, 50)
# scene class in pygame
class Scene():
def __init__(self):
self.next_scene = self
def process_input(self, events, press):
raise NotImplementedError
def update(self):
raise NotImplementedError
def rendering(self):
raise NotImplementedError
def terminate(self):
self.next_scene = None
# this will be the first scene class as
# the prime and opening scene of our app
class starting_scene(Scene):
def __init__(self):
super().__init__()
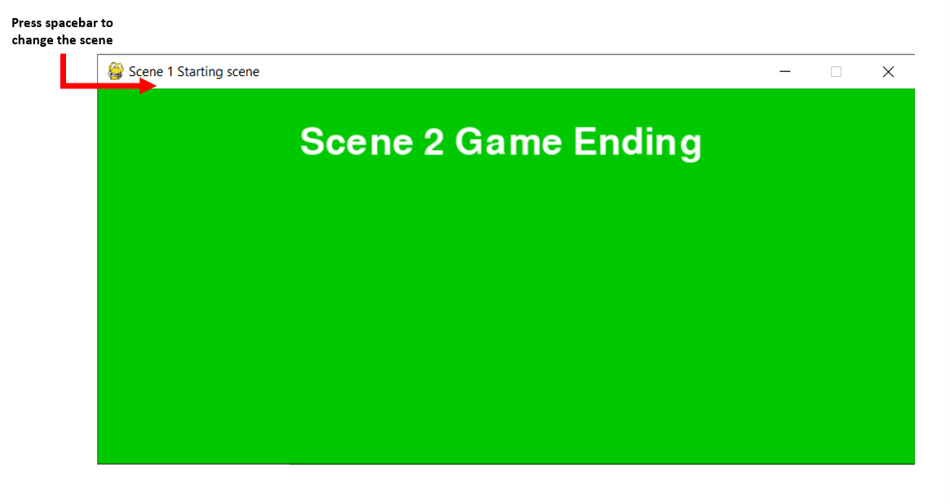
def process_input(self, events, press):
for event in events:
if event.type == py.KEYDOWN:
if event.key == py.K_SPACE:
self.next_scene = EndScene()
def rendering(self):
screen.fill(green)
text = screen_font.render(title_py, 1, white)
rect = text.get_rect()
rect.centerx = 740 // 2
rect.centery = 50
screen.blit(text, rect)
def update(self):
pass
class EndScene(Scene):
def __init__(self):
super().__init__()
def process_input(self, events, press):
for event in events:
if event.type == py.KEYDOWN:
if event.key == py.K_SPACE:
self.next_scene = starting_scene()
def update(self):
pass
# rendering the scene function
def rendering(self):
screen.fill(green)
# font color will be white
text = screen_font.render("Scene 2 Game Ending ", 1, white)
rect = text.get_rect()
rect.centerx = 370 # location from x-axis
rect.centery = 50 # location from y-axis
screen.blit(text, rect)
class app_class():
def __init__(self):
self.running_scene = starting_scene()
def control(self, event, press):
x_out = event.type == py.QUIT
quit = press[py.K_q]
# if anyone click on the cross
# button or press the 'q' button
# it will quit the window
return x_out or (quit)
def run(self):
while self.running_scene != None:
eve = []
press = py.key.get_pressed()
for event in py.event.get():
if self.control(event, press):
self.running_scene.terminate()
else:
eve.append(event)
# Manage scene
self.running_scene.process_input(eve, press)
self.running_scene.update()
# dont move it as first we need to update then render
self.running_scene.rendering()
# moving the scene one by one
self.running_scene = self.running_scene.next_scene
# means it will allow user to change the scene
py.display.flip()
# Update and tick
clock.tick(frame)
# main (our code will run from here)
if __name__ == "__main__":
let_check = app_class()
let_check.run()
py.quit()
输出:
按空格键改变场景
场景2
不同的 Windows 模式
在 Pygame 中有三种不同的窗口模式可以显示活动窗口,它们是:
- 全屏模式(顾名思义,它是一个具有完全可调整大小功能的窗口)
- 可调整大小的模式(在这种模式下允许调整大小)
- 无框架模式(在这种模式下,窗口中没有标题栏)
设置这些模式所需的步骤:
- 首先,我们在初始化的应用类方法中声明屏幕大小和显示模式标志。
- 现在我们将为它创建一个屏幕表面
pygame_screen.init()- 创建表面对象
# for FULLSCREEN mode
display_surface = pygame_screen.display.set_mode((500,250), FULLSCREEN)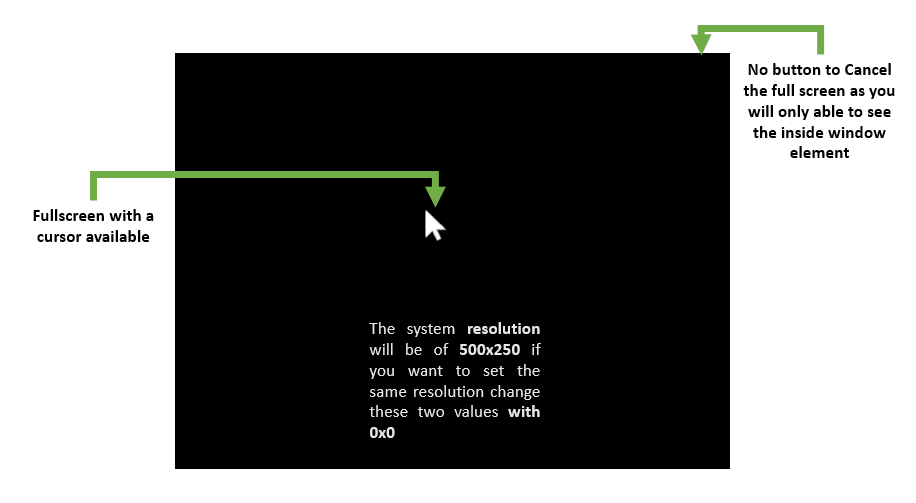
pygame 中的全屏模式
# for RESIZABLE mode
display_surface = pygame_screen.set_mode((500, 250), RESIZABLE)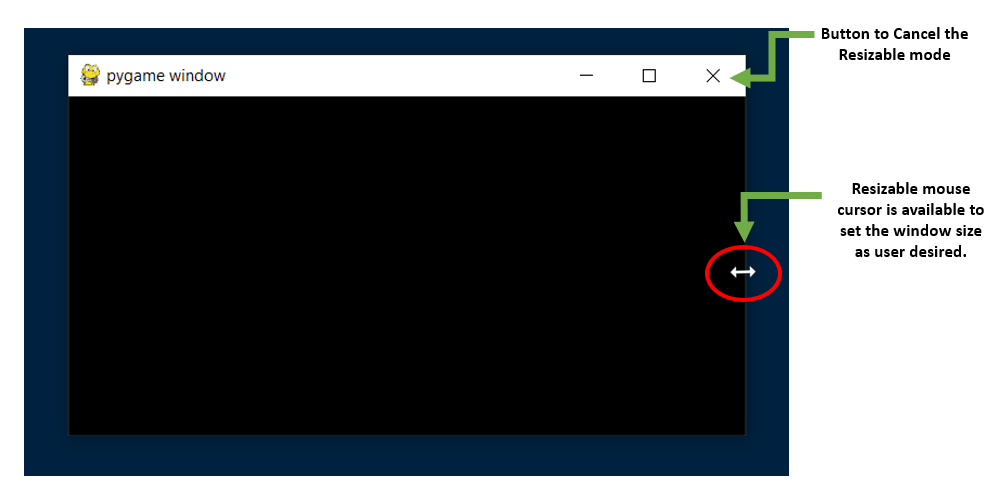
pygame 中的 RESIZABLE 模式
# for NOFRAME mode
display_surface = pygame_screen.display.set_mode((500, 250), NOFRAME)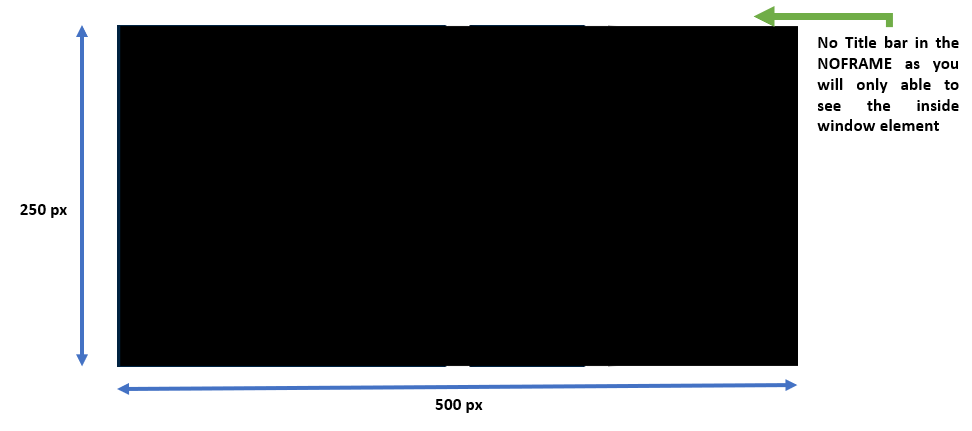
pygame 中的 NOFRAME 模式
- 现在运行主循环以执行屏幕的QUIT和更新命令
上述模式的代码:
Python3
import pygame as py
from pygame.locals import *

# Create a displace surface object
py.init()

# Un-comment one of the following
# three line of code for varied mode of pygame
# display_surface = py.display.set_mode((500, 250), NOFRAME)
# display_surface = py.display.set_mode((500, 250), FULLSCREEN)
display_surface = py.display.set_mode((500, 250), RESIZABLE)

working = True
while working:  # run until it become false
    for event in py.event.get():
        if event.type == py.QUIT:
            working = False
    py.display.update()

py.quit()  # quit the window
输出:

节点放置:
节点充当图形用户界面元素和对象的容器。 Pygame 中的节点放置需要四个参数:
- size:这有助于在屏幕上找到节点的当前大小
- pos:这有助于找到节点的当前位置
- dir: dir 是方向的简称。它本身由垂直、水平和对角线三个参数组成。
- gap:这是指 Pygame 中两个节点之间的空间。